Developer Guide
TutorPro is a desktop app designed to help private tutors manage their student information effectively. With TutorPro, tutors can easily keep track of their students’ addresses, contact details, lessons, homework, and progress, all in one place. This app is optimized for use via a Graphical User Interface (GUI), allowing tutors to interact with the app using easy-to-understand buttons and menus. However, TutorPro also provides a Command Line Interface (CLI) for those who prefer a faster way of getting things done. Whether you’re managing a handful of students or hundreds, TutorPro can help you streamline your workflow and make your tutoring experience more efficient.
Table of Contents
- Table of Contents
- Acknowledgements
- Setting up, getting started
- Design
- Implementation
- Documentation, logging, testing, configuration, dev-ops
- Appendix: Requirements
-
Use cases
- Add a new student
- Delete a student
- Update a student’s particulars
- View a student’s profile
- Assign homework for a student
- View a Student’s Homework
- Mark a Homework as DONE
- Mark a Homework as NOT DONE
- View a particular Student’s Lessons
- View all Students’ Lesson history
- Add Lesson
- Add Exam
- View a particular Student’s Exams
- View all Students’ Exams
- Non-Functional Requirements
- Glossary
- Appendix: Instructions for manual testing
- Appendix: Effort
Table of contents generated with markdown-toc
Acknowledgements
- This project is built from the AddressBook-Level3 project created by the SE-EDU initiative.
Setting up, getting started
Refer to the guide Setting up and getting started_.
Design
.puml files used to create diagrams in this document can be found in the diagrams’ folder. Refer to the PlantUML Tutorial at se-edu/guides to learn how to create and edit diagrams.
Architecture

The Architecture Diagram given above explains the high-level design of the App.
Given below is a quick overview of the main components and how they interact with each other.
Main components of the architecture
Main has two classes called Main and MainApp. It is responsible for,
- At app launch: Initializes the components in the correct sequence, and connects them up with each other.
- At shut down: Shuts down the components and invokes cleanup methods where necessary.
Commons represents a collection of classes used by multiple other components.
The rest of the App consists of four components.
-
UI: The UI of the App. -
Logic: The command executor. -
Model: Holds the data of the App in memory. -
Storage: Reads data from, and writes data to, the hard disk.
How the architecture components interact with each other
The Sequence Diagram below shows how the components interact with each other for the scenario where the user issues the command delete 1.

Each of the four main components (also shown in the diagram above),
- defines its API in an
interfacewith the same name as the Component. - implements its functionality using a concrete
{Component Name}Managerclass (which follows the corresponding APIinterfacementioned in the previous point.
For example, the Logic component defines its API in the Logic.java interface and implements its functionality using the LogicManager.java class which follows the Logic interface. Other components interact with a given component through its interface rather than the concrete class (reason: to prevent outside component’s being coupled to the implementation of a component), as illustrated in the (partial) class diagram below.

The sections below give more details of each component.
UI component
The API of this component is specified in Ui.java

The UI consists of a MainWindow that is made up of parts e.g.CommandBox, ResultDisplay, studentListPanel, StatusBarFooter etc. All these, including the MainWindow, inherit from the abstract UiPart class which captures the commonalities between classes that represent parts of the visible GUI.
The UI component uses the JavaFx UI framework. The layout of these UI parts are defined in matching .fxml files that are in the src/main/resources/view folder. For example, the layout of the MainWindow is specified in MainWindow.fxml
The UI component,
- executes user commands using the
Logiccomponent. - listens for changes to
Modeldata so that the UI can be updated with the modified data. - keeps a reference to the
Logiccomponent, because theUIrelies on theLogicto execute commands. - depends on some classes in the
Modelcomponent, as it displaysstudentobject residing in theModel.
Logic component
API : Logic.java
Here’s a (partial) class diagram of the Logic component:

How the Logic component works:
- When
Logicis called upon to execute a command, it uses theAddressBookParserclass to parse the user command. - This results in a
Commandobject (more precisely, an object of one of its subclasses e.g.,AddCommand) which is executed by theLogicManager. - The command can communicate with the
Modelwhen it is executed (e.g. to add a student). - The result of the command execution is encapsulated as a
CommandResultobject which is returned fromLogic.
The Sequence Diagram below illustrates the interactions within the Logic component for the execute("delete
index/1") API call.

DeleteCommandParser should end at the destroy marker (X) but due to a limitation of PlantUML, the lifeline reaches the end of diagram.
the Here are the other classes in Logic (omitted from the class diagram above) that are used for parsing a user command:

How the parsing works:
- When called upon to parse a user command, the
AddressBookParserclass creates anXYZCommandParser(XYZis a placeholder for the specific command name e.g.,AddCommandParser) which uses the other classes shown above to parse the user command and create aXYZCommandobject (e.g.,AddCommand) which theAddressBookParserreturns back as aCommandobject. - All
XYZCommandParserclasses (e.g.,AddCommandParser,DeleteCommandParser, …) inherit from theParserinterface so that they can be treated similarly where possible e.g, during testing.
Model component
API : Model.java

The Model component,
- stores the address book data i.e., all
Studentobjects (which are contained in aUniqueStudentListobject). - stores the currently ‘selected’
Studentobjects (e.g., results of a search query) as a separate filtered list which is exposed to outsiders as an unmodifiableObservableList<Student>that can be ‘observed’ e.g. the UI can be bound to this list so that the UI automatically updates when the data in the list change. - stores a
UserPrefobject that represents the user’s preferences. This is exposed to the outside as aReadOnlyUserPrefobjects. - doesn’t depend on any of the other three components (as the
Modelrepresents data entities of the domain, they should make sense on their own without depending on other components)
Storage component
API : Storage.java

The Storage component,
- can save both address book data and user preference data in json format, and read them back into corresponding objects.
- inherits from both
AddressBookStorageandUserPrefStorage, which means it can be treated as either one (if only the functionality of only one is needed). - depends on some classes in the
Modelcomponent (because theStoragecomponent’s job is to save/retrieve objects that belong to theModel)
Common classes
Classes used by multiple components are in the seedu.addressbook.commons package.
Implementation
This section describes some noteworthy details on how certain features are implemented.
Quick Access Buttons on Each Student Card
Motivation for Quick Access Buttons
When a tutor wants to view a student's profile, homework, lessons, or exams, they need to use the commandBox. However, the current ResultDisplay is purely text-based, making it difficult and time-consuming for tutors to access and digest the relevant information.
To address this issue, we propose the implementation of Quick Access Buttons on each Student Card. These buttons will provide tutors with easy and quick access to the relevant student information. By simply clicking on the appropriate button, tutors can view the student's profile, homework, lessons, or exams in a more informative and visually appealing way, complete with multiple diagrams or charts.
The inclusion of these Quick Access Buttons will not only improve the user experience for tutors but also save them valuable time that can be better spent on other aspects of their teaching. With the information at their fingertips, tutors will be better equipped to make informed decisions and provide personalized guidance to each student.
Implementation of Quick Access Buttons
Given below is the partial class diagram of Ui component related to Quick Access Buttons on the Student Card.
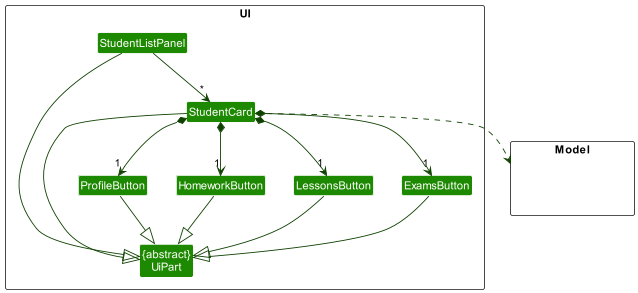
Each Student Card contains exactly four buttons Profile, Homework, Lessons, and Exams. Each of the buttons can generate a Special DetailedContent, which will be displayed in the DetialedInfoSection on the MainWindow
Given below is the partial class diagram of Ui component related to Detailed Information Section on the Student Card.
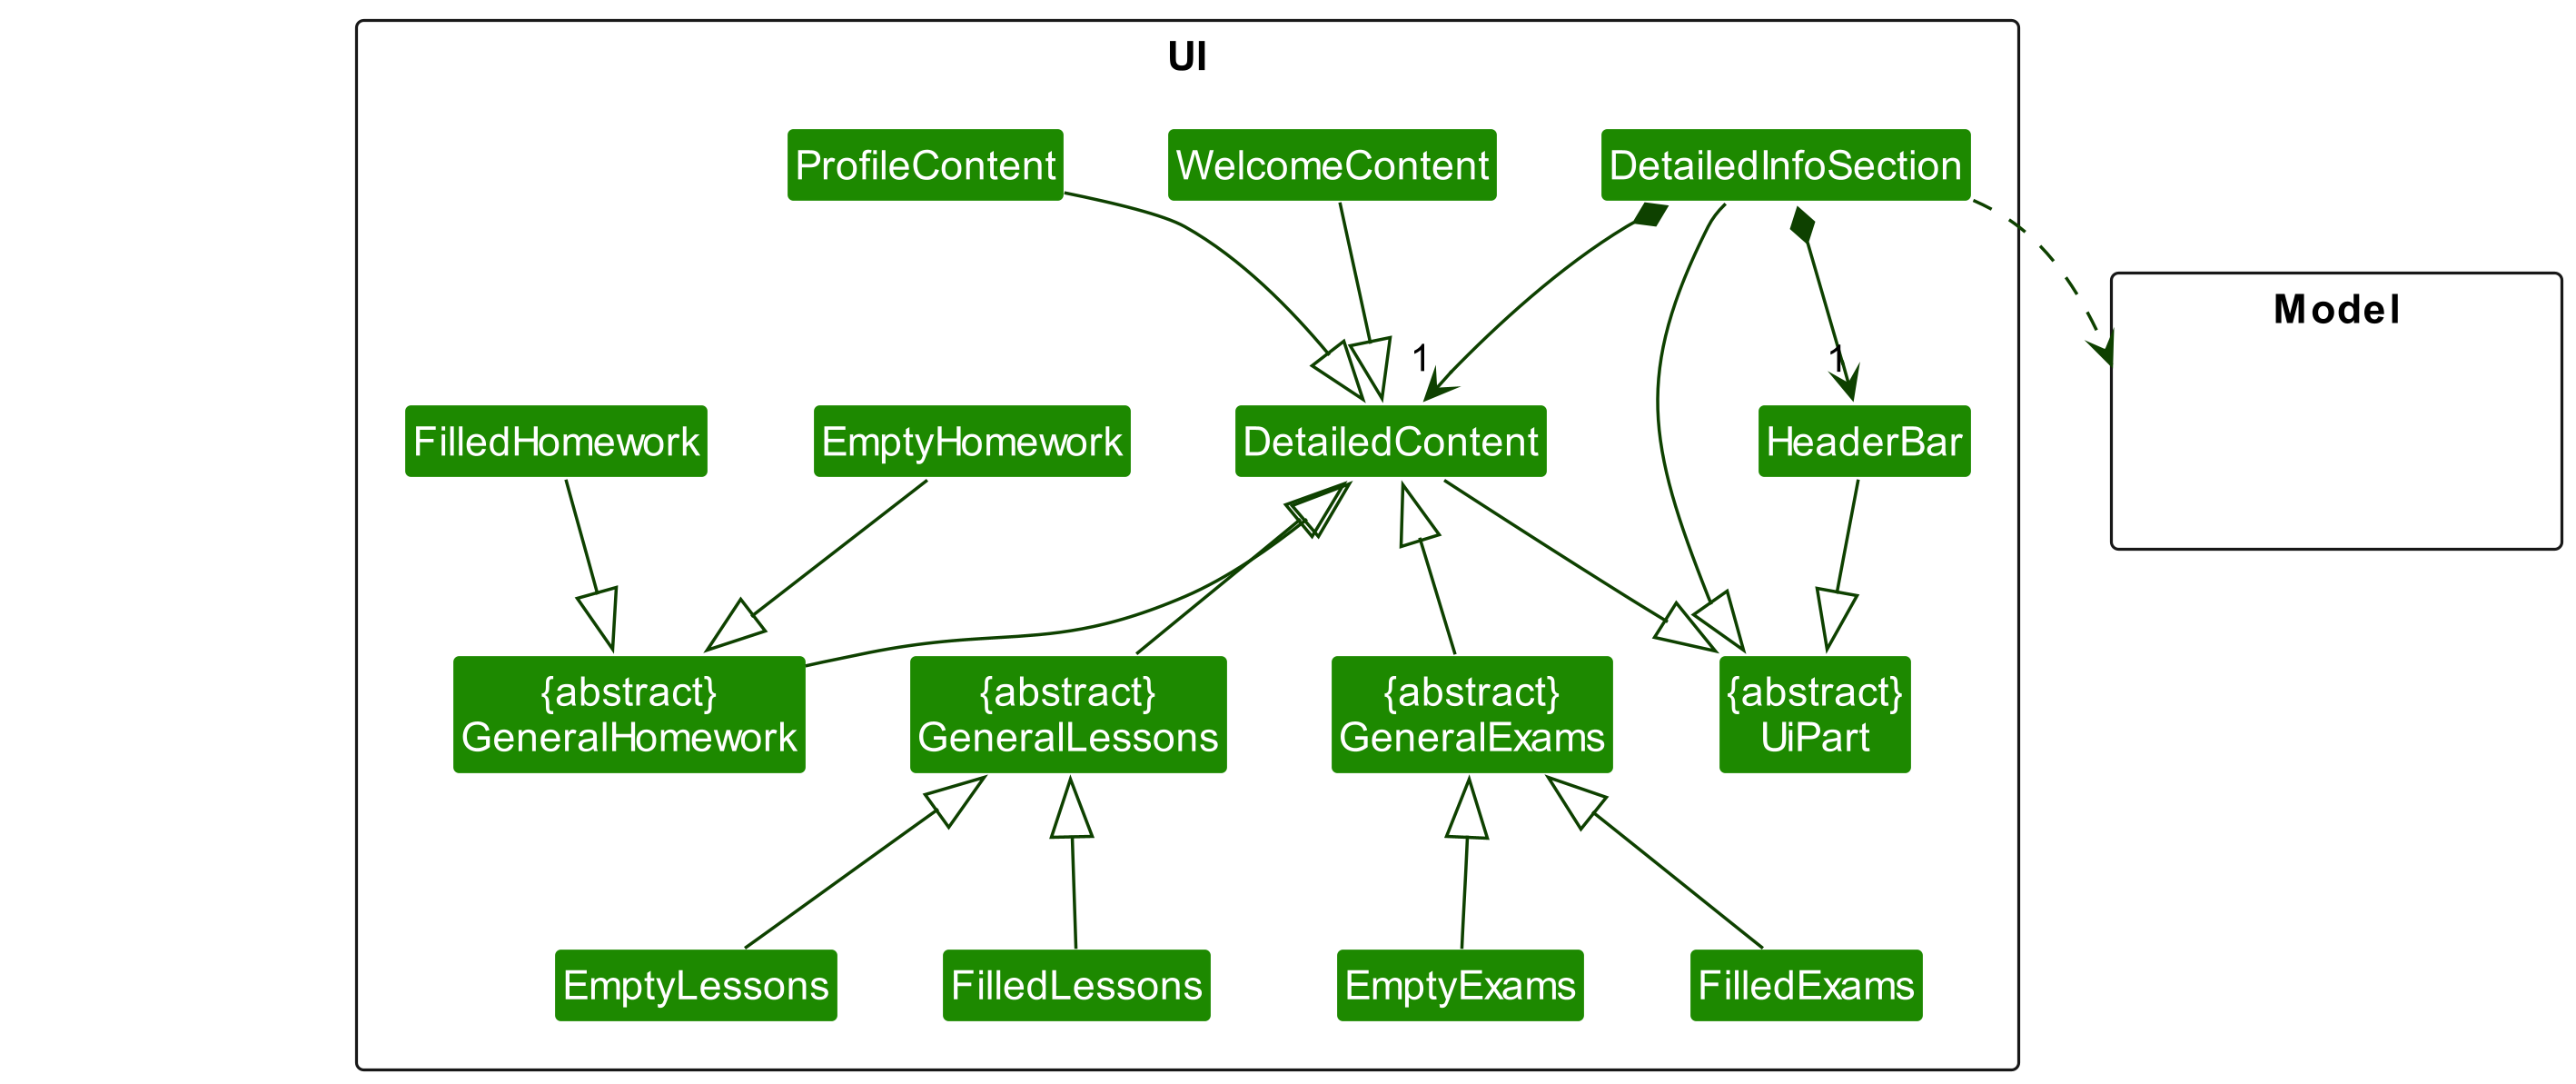
The DetailedInfoSection is made up of a HeaderBar, displaying the type of the current DetailedInfoSection and the name of the Student to which the information belongs. DetailedContentcomponent has five subclasses extending it, namely WelcomeContent, ProfileContent, GeneralHomeworkContent, GeneralLessonsContent, GeneralExamsContent.
Given below is the partial class diagram of Ui component related to Profile Content.
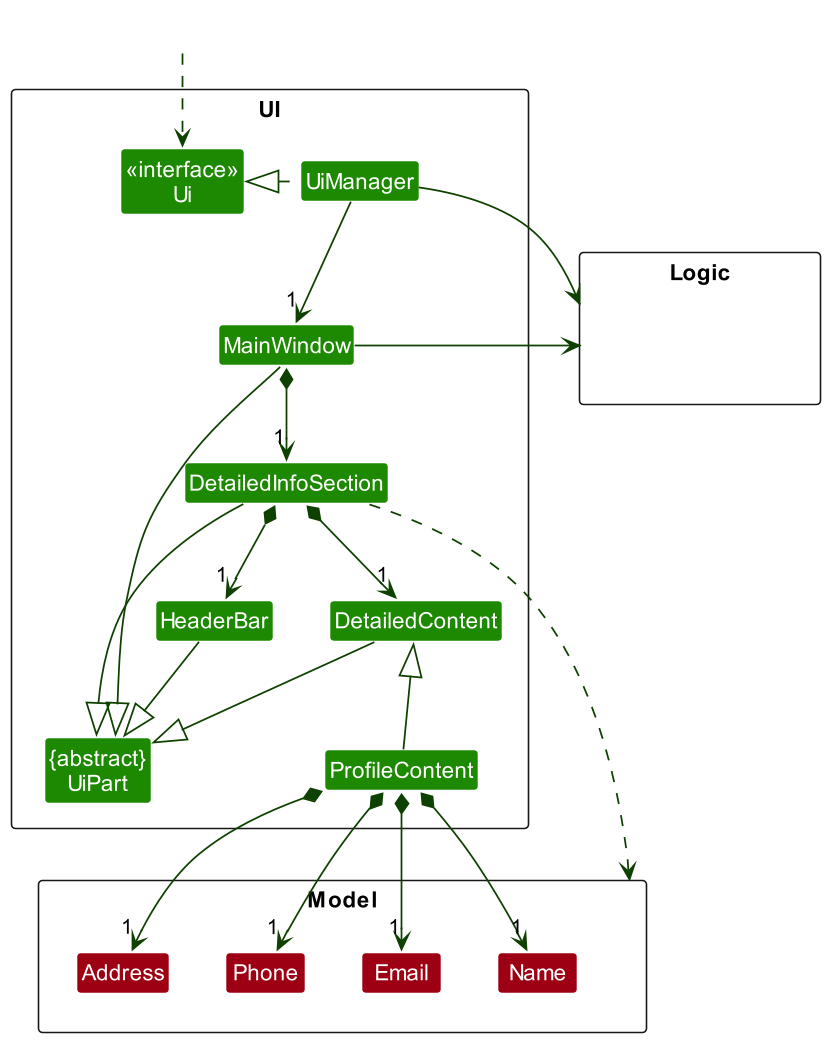
Given below is the sequence diagram showing how the action of clicking the ProfileButton of a Student creates a new ProfileContent for that particular student
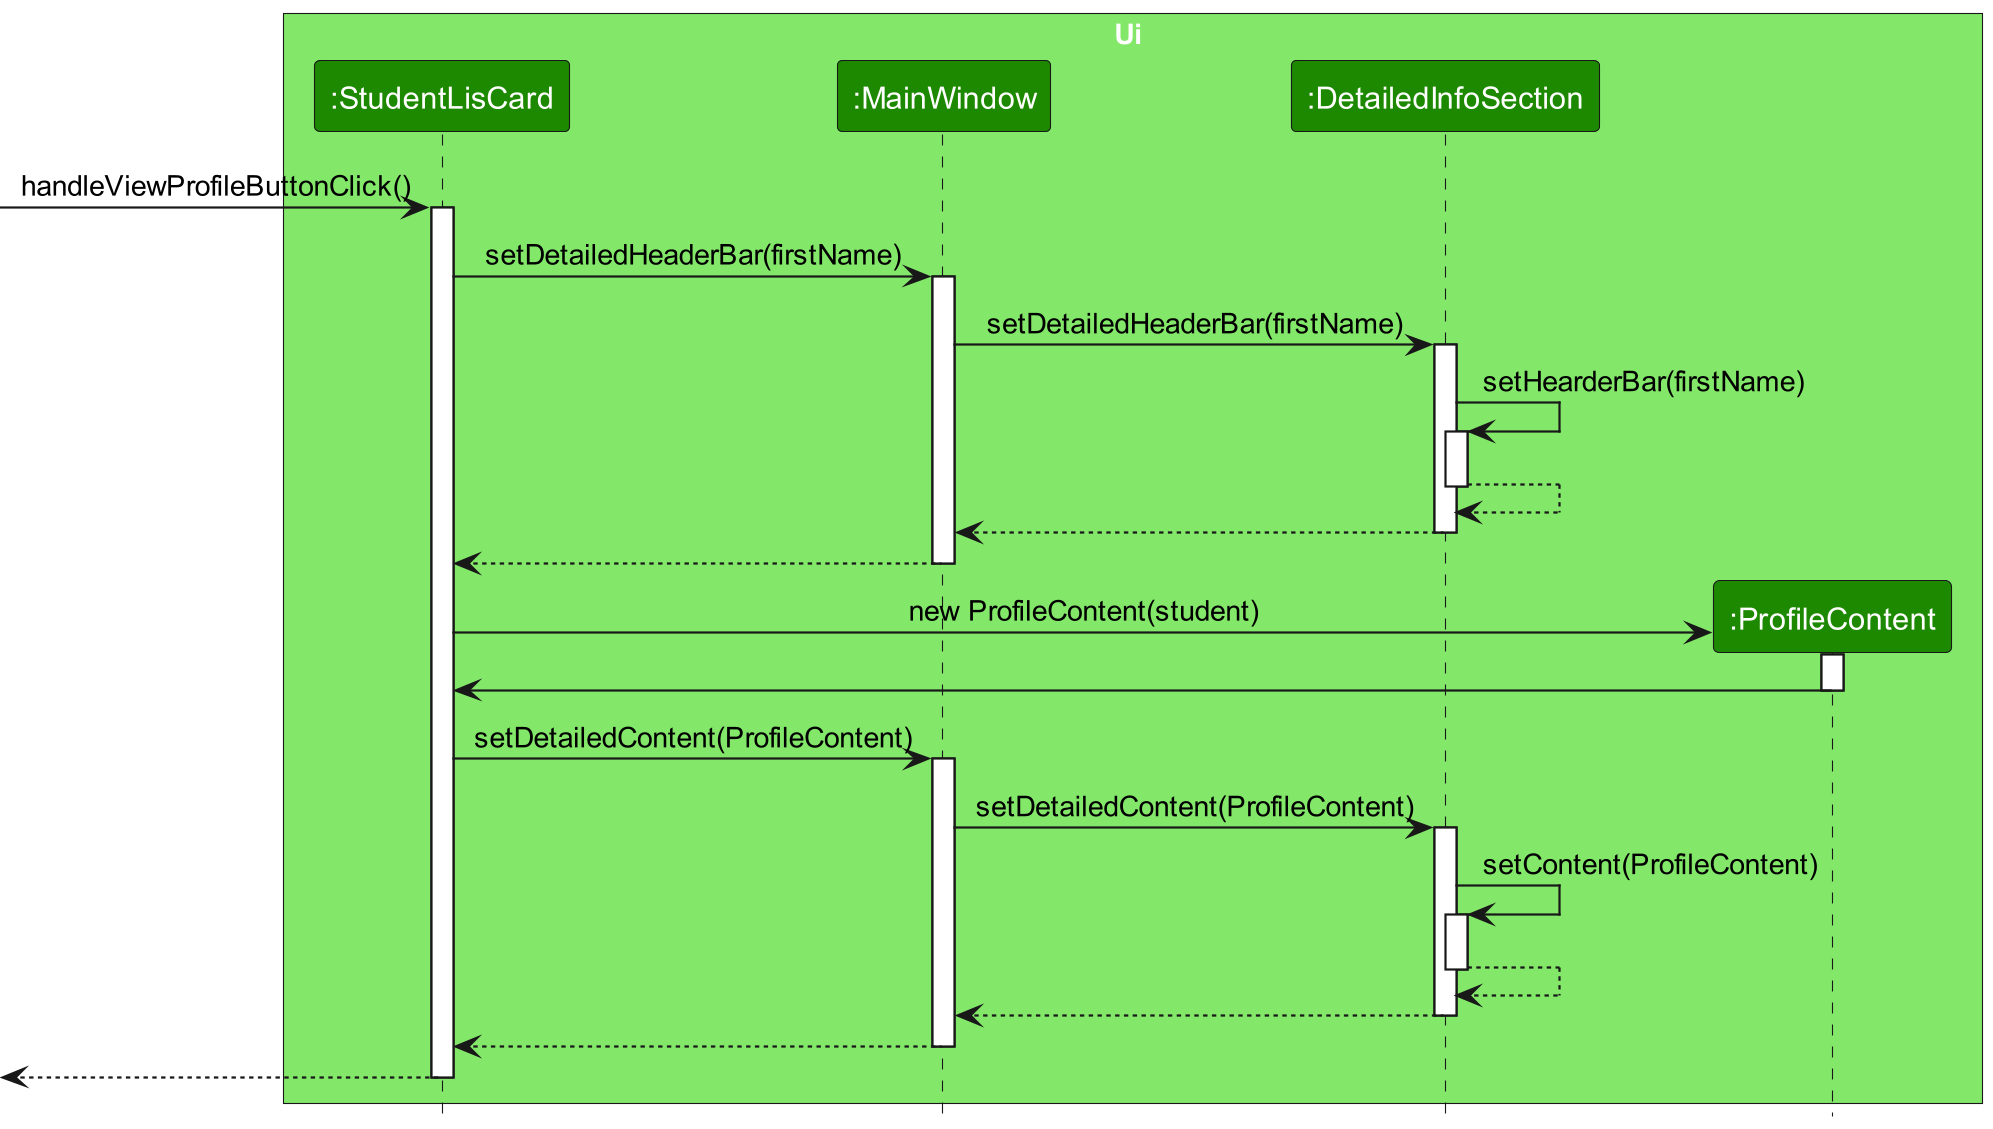
How the Profile Section is created when the Profile Button is Clicked
- Based on the graph above, after the user clicks the view profile button,
StudentCardcallsStudent#getFullName(), which then callsName#getFirstName(). -
StudentCardthen callsDetailedInfoSection#SetDeatiledHeaderBar(), which then callsDetailedInfoSection#SetDeatiledHeaderBar(), with theFirstNamereturned from the previous calls. -
DetailedInfoSectioncreates a newHeaderBarand sets it to be the newDetailedHeaderBarto be displayed. -
StudentCardwill create a newProfileContentwith theStudent. - The
ProfileContentconstructor callsStudent#getName(),Student#getPhone(),Student#getEmail(),Student#getAddress()which returns the name, phone, email, and address of the student. -
StudentCardthen callsDetailedInfoSection#SetDeatiledContent(), which then callsDetailedInfoSection#SetDeatiledContent(), with theProfileContentcreated from the previous calls. -
DetailedInfoSectionsets it to be the newDetailedContentto be displayed.
GeneralHomeworkContent, GeneralLessonsContent, GeneralExamsContent are further extended by subclasses:
-
EmptyHomeworkContentandFilledHomeworkContentextendGeneralHomeworkContent, representing the situation where theStudenthasHomeworkand where theStudenthas noHomeworkrespectively.Specifically,
FilledHomeworkContenthasHomeworkListPanelwithHomeworkCardon it, showing all homework of aStudentand aHomeworkPieChart, reflecting the ratio of completed and pendingHomeworkof aStudent.Given below is the partial class diagram of
Uicomponent related to Filled Homework Content.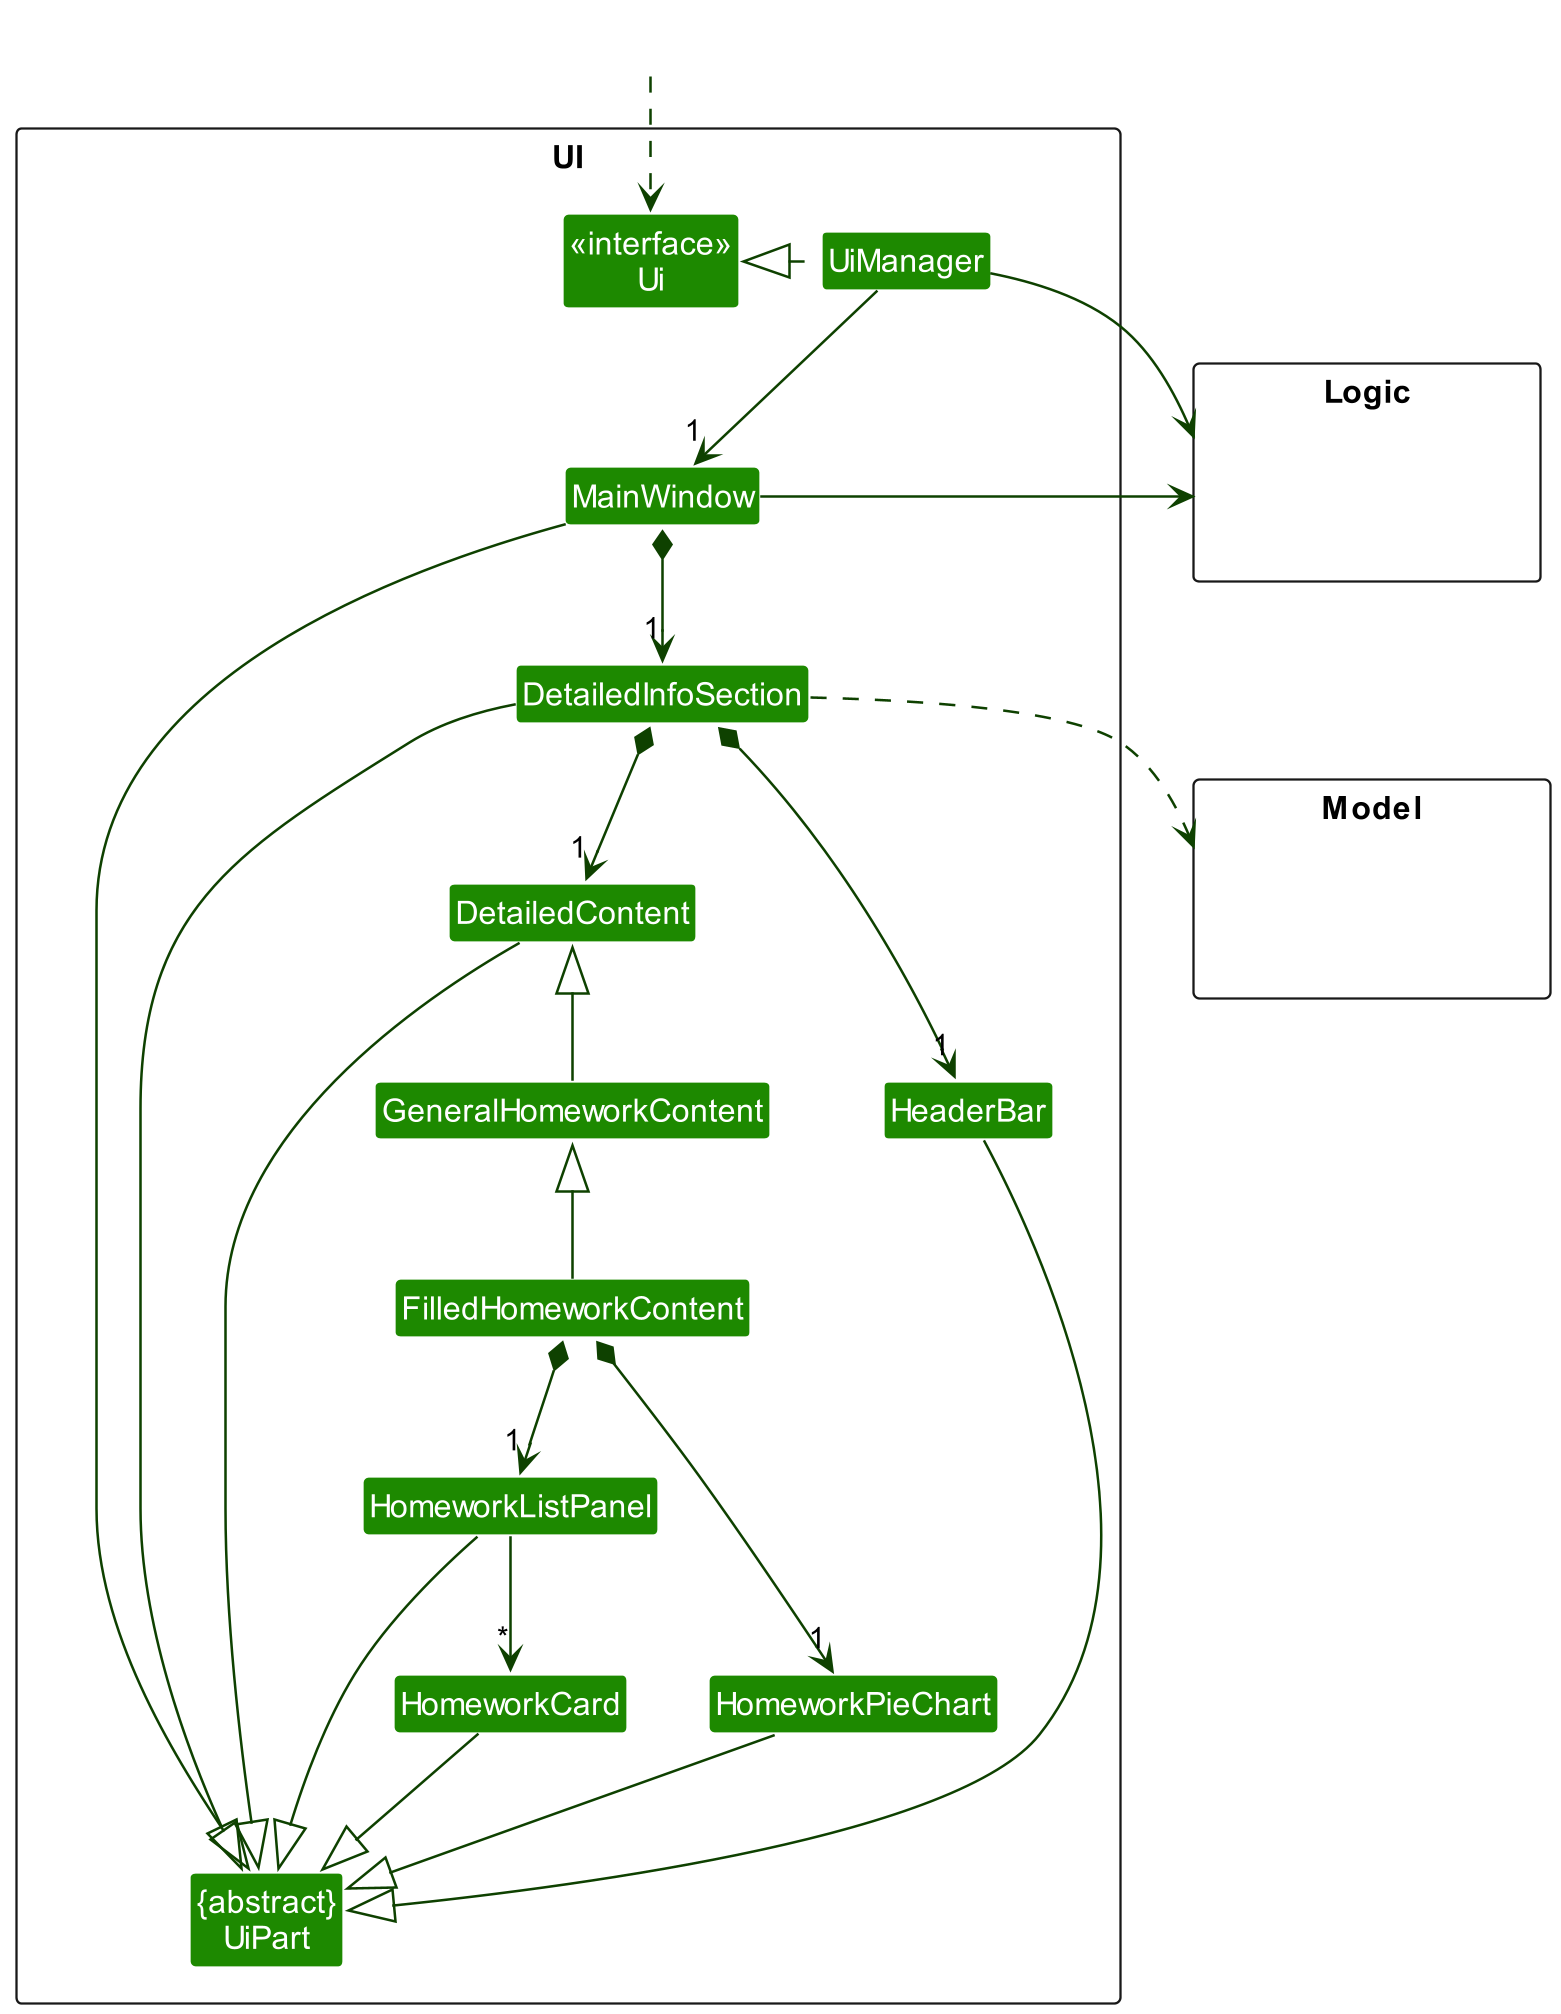
Given below is the sequence diagram showing how the action of clicking the
HomeworkButtonof aStudentcreates a newHomeworkContentfor that particular student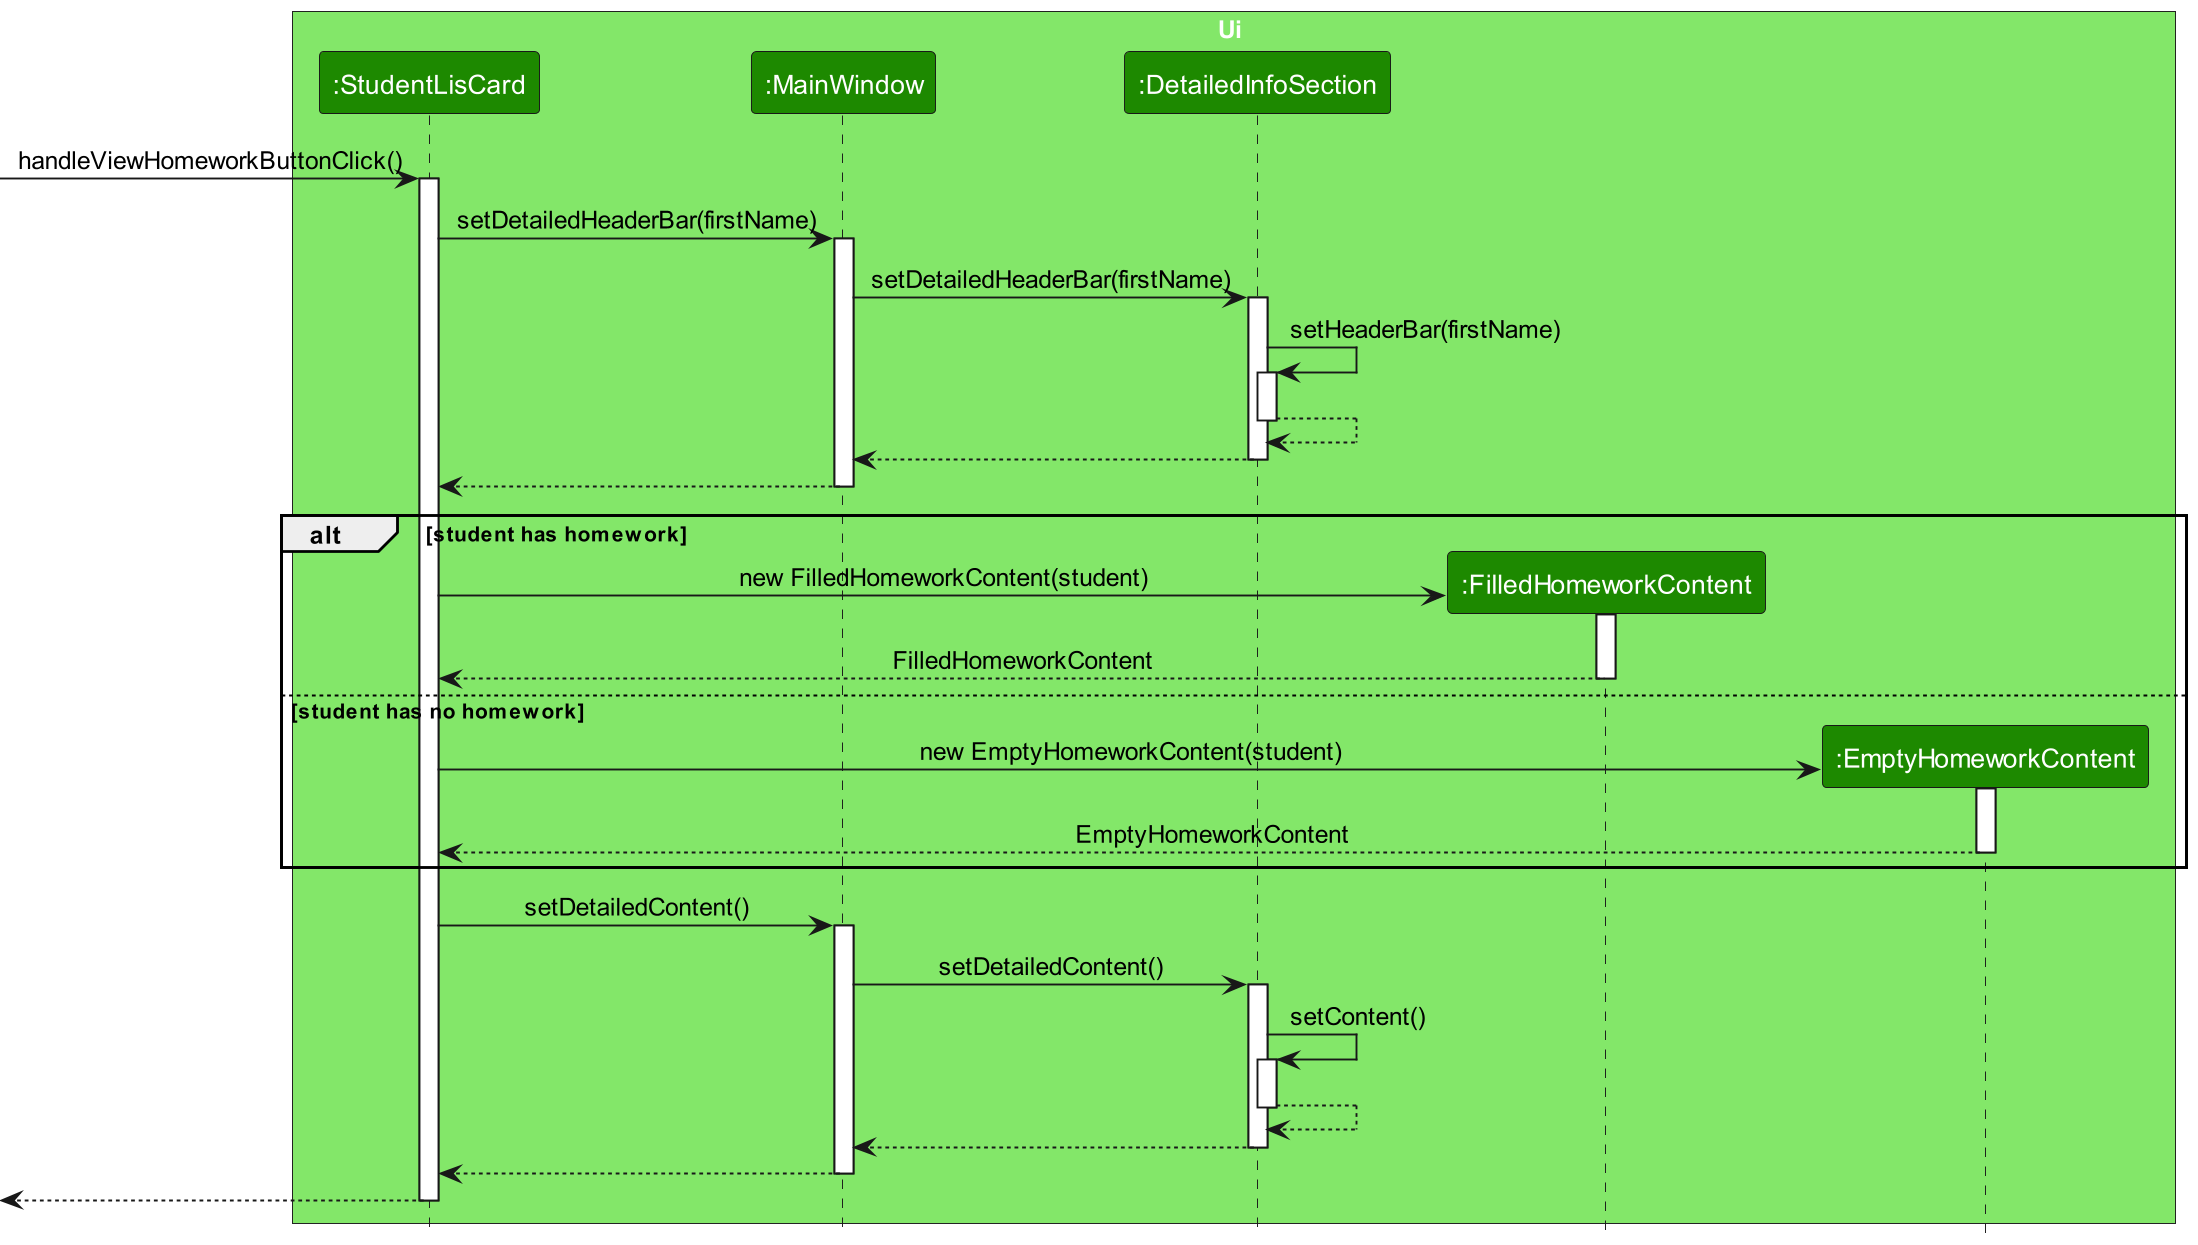
How the Filled Homework Section is created when the Homework Button is Clicked
- Based on the graph above, after the user clicks the view homework button,
StudentCardcallsStudent#getFullName(), which then callsName#getFirstName(). -
StudentCardthen callsDetailedInfoSection#SetDeatiledHeaderBar(), which then callsDetailedInfoSection#SetDeatiledHeaderBar(), with theFirstNamereturned from the previous calls. -
DetailedInfoSectioncreates a newHeaderBarand sets it to be the newDetailedHeaderBarto be displayed. - If
Studentdoes not haveHomework,StudentCardwill create a newEmptyHomeorkContentwith theStudent. - If
StudenthaveHomework,StudentCardwill create a newFilledHomeorkContentwith theStudent. - The
FilledHomeworkContentconstructor callsStudent#getName(),Student#getHomeworkPiechartData(),Student#HomeworkList(), which returns the name, Pie Chart Data, and Homework List. -
StudentCardthen callsDetailedInfoSection#SetDeatiledContent(), which then callsDetailedInfoSection#SetDeatiledContent(), with theEmptyHomeworkContentorFilledHomeworkContentcreated from the previous calls. -
DetailedInfoSectionsets it to be the newDetailedContentto be displayed.
- Based on the graph above, after the user clicks the view homework button,
-
EmptyLessonsContentandFilledLessonsContentextendGeneralLessonsContent, representing the situation where theStudenthasLessonsand where theStudenthas noLessonsrespectively.Specifically,
FilledLessonsContenthasPastLessonsListPanelwithLessonCardon it, showing all pastLessonsof aStudentandUpcomingLessonsListPanelwithLessonCardon it, showing all upcomingLessonsof aStudent.Given below is the partial class diagram of
Uicomponent related to Filled Lessons Content.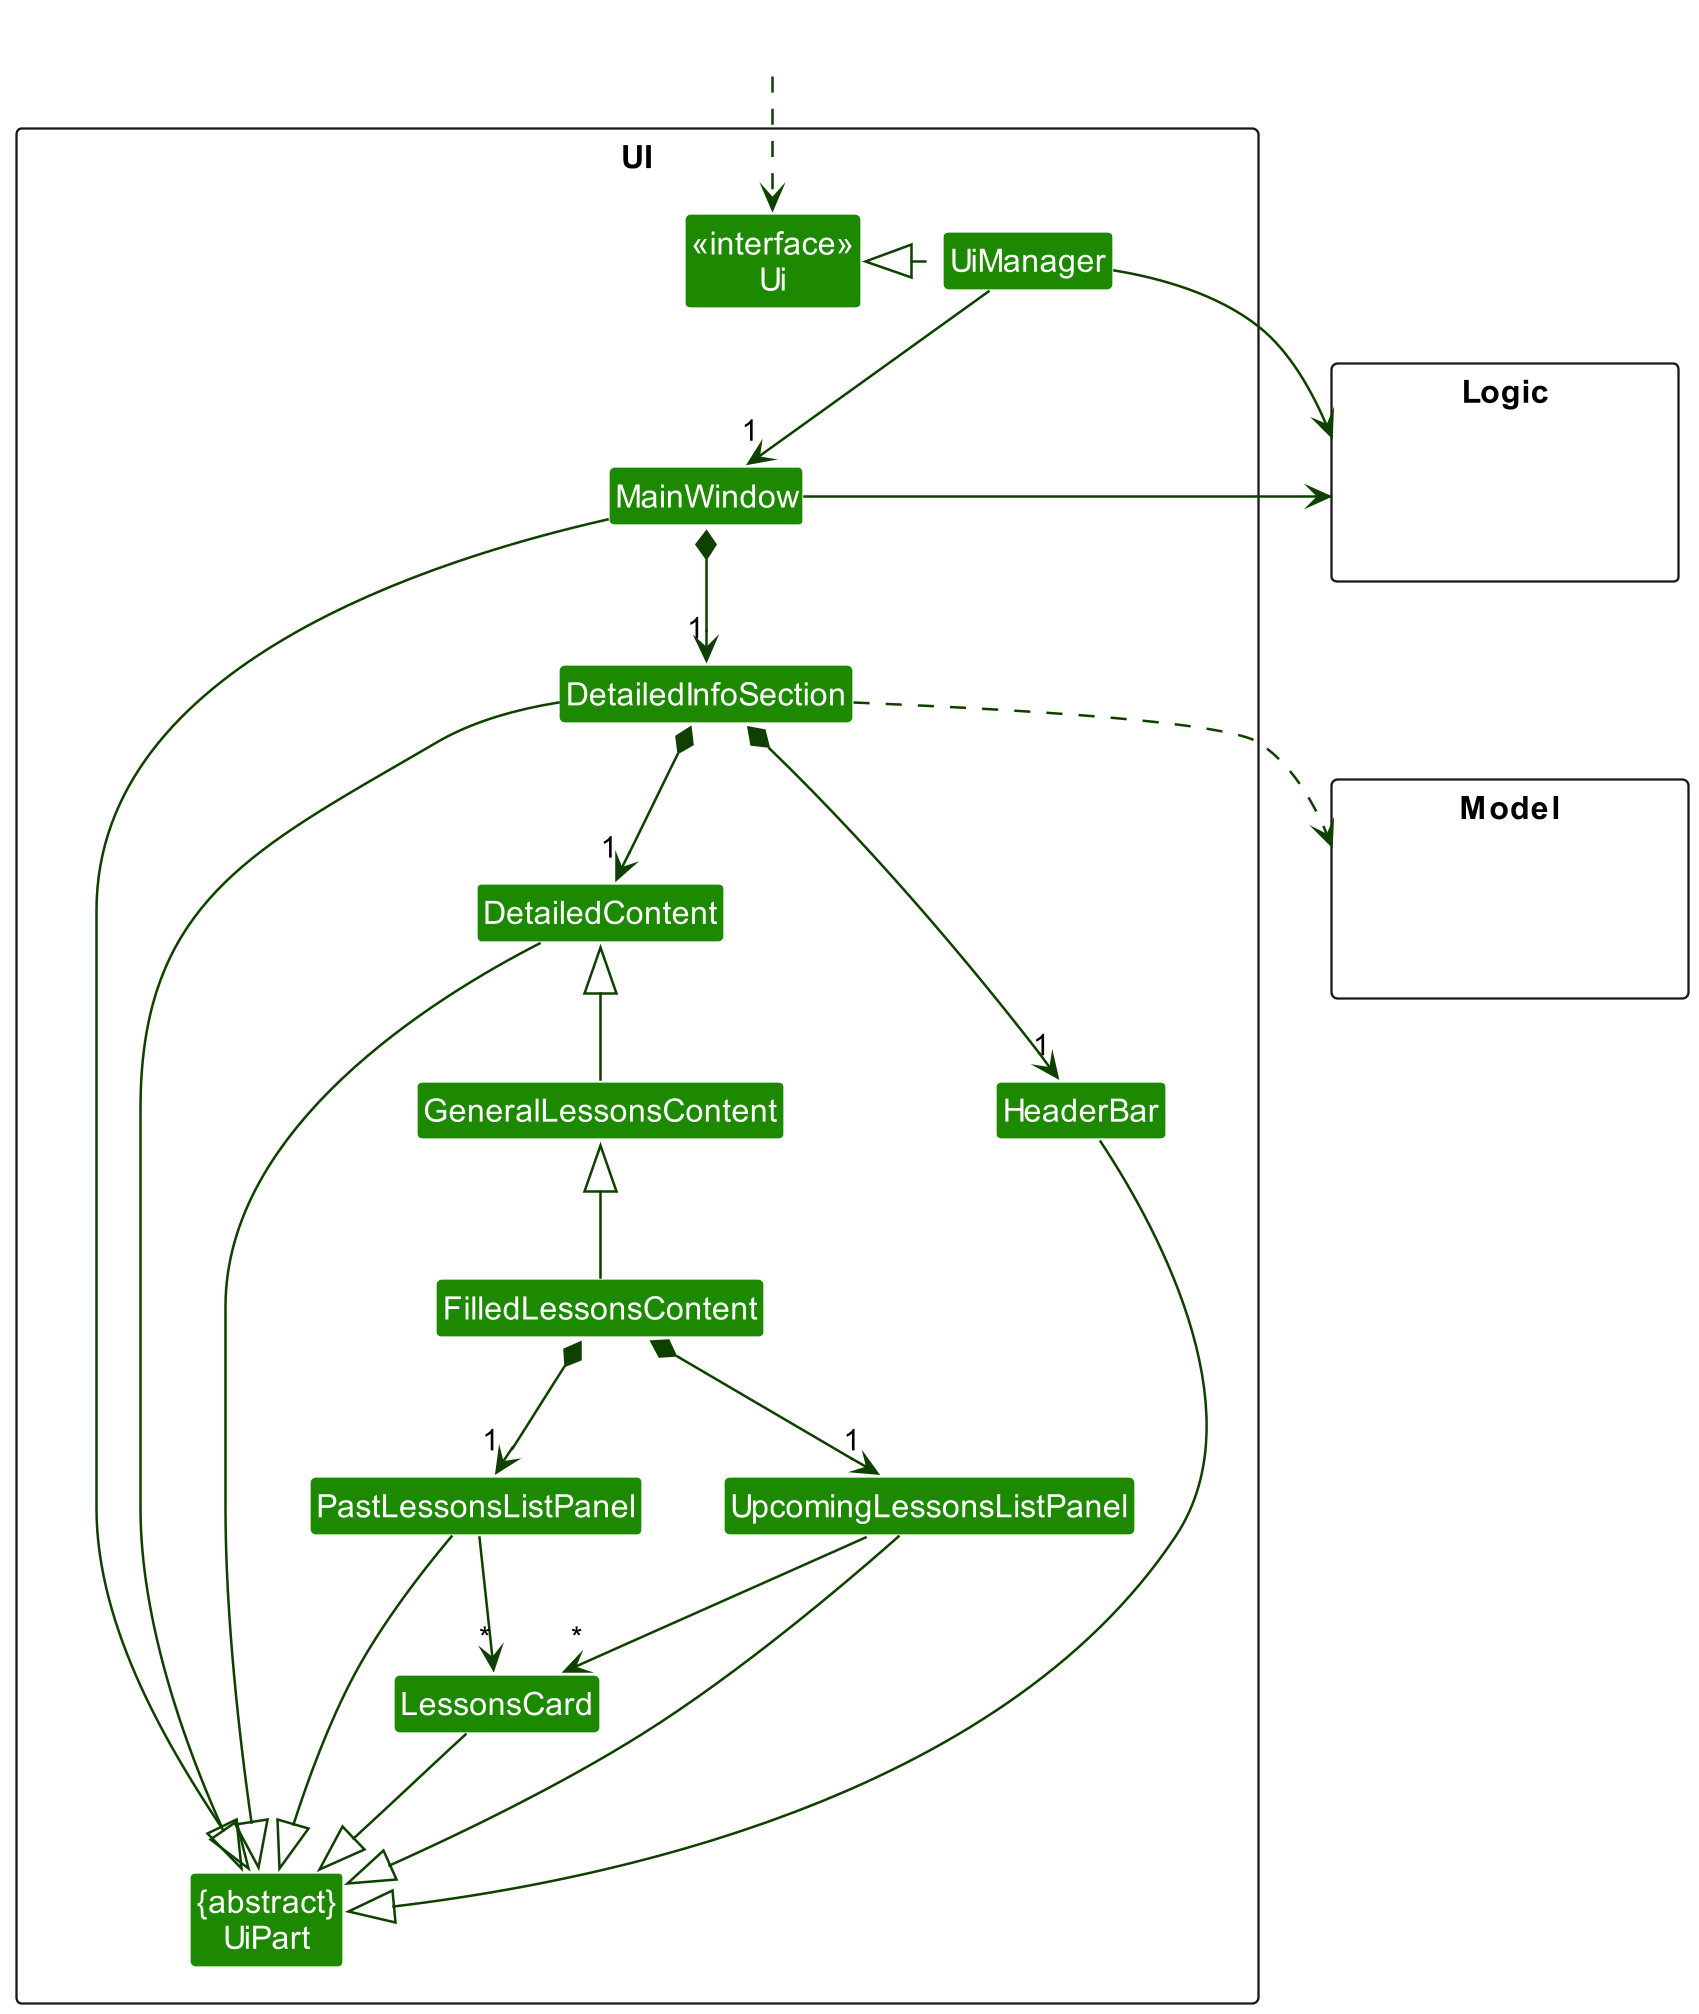
Given below is the sequence diagram showing how the action of clicking the
LessonsButtonof aStudentcreates a newLessonsContentfor that particular student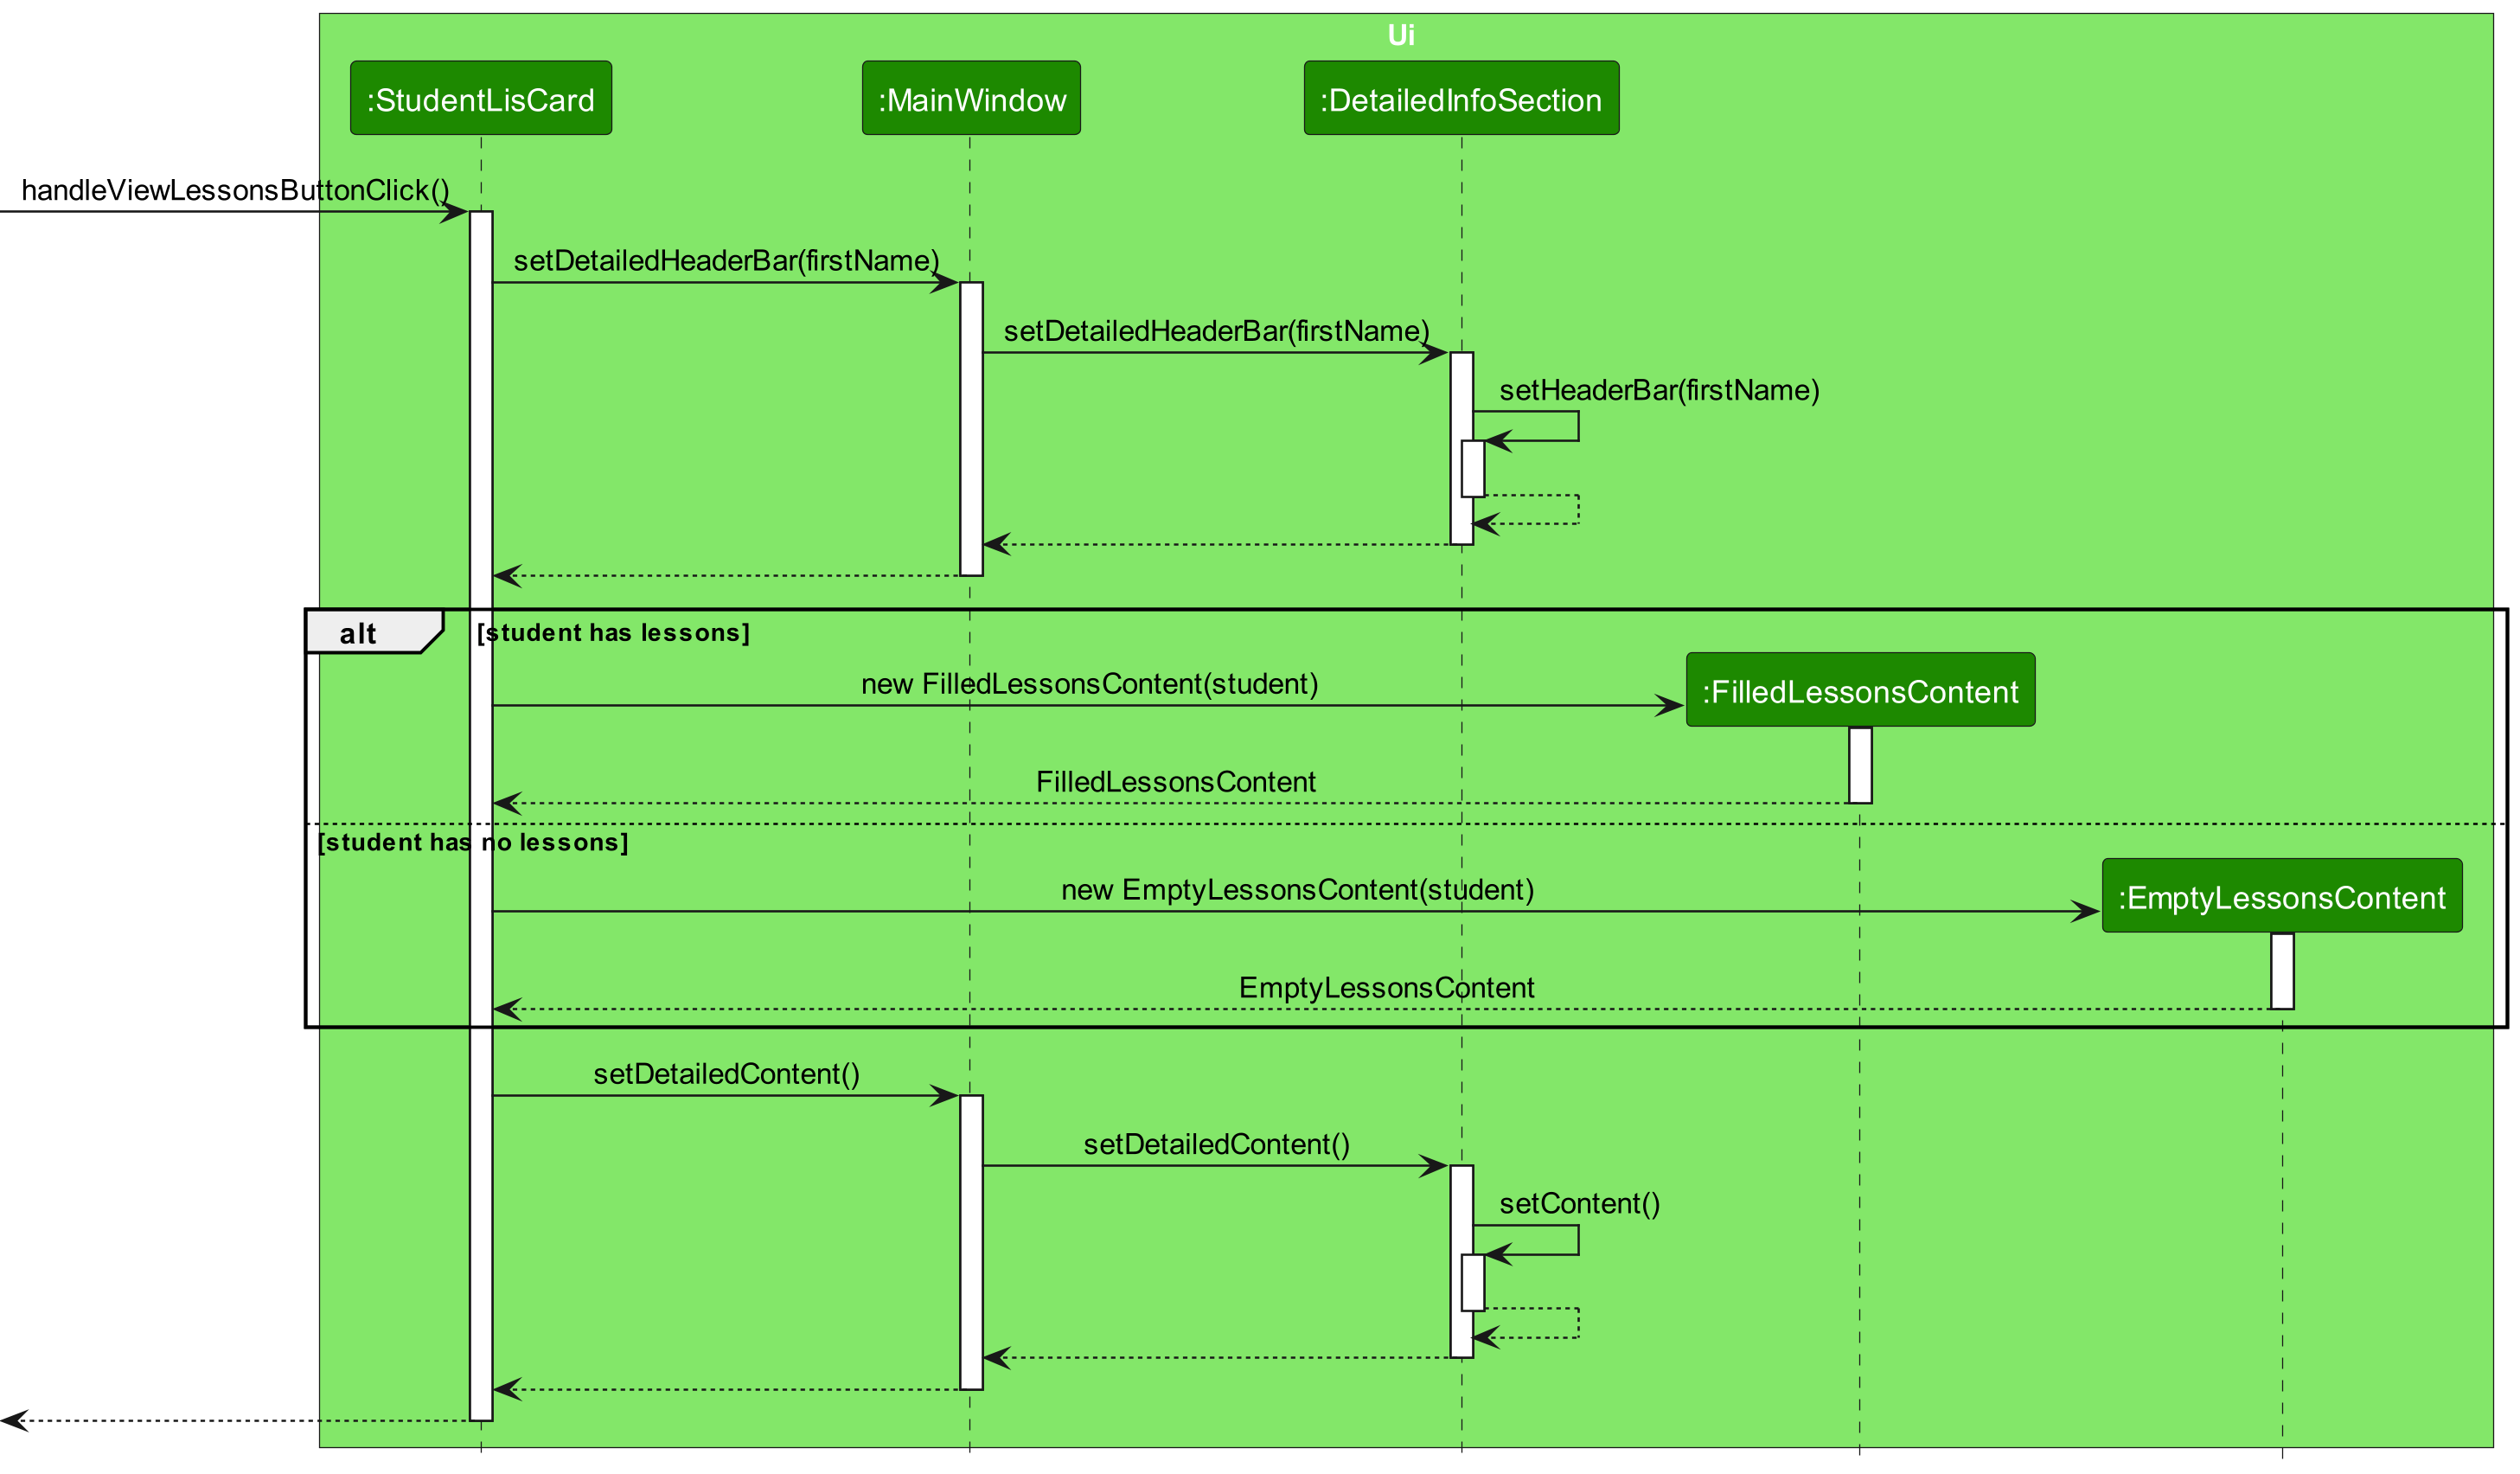
How the Filled Lessons Section is created when the Lesson Button is Clicked
- Based on the graph above, after the user clicks the view lessons button,
StudentCardcallsStudent#getFullName(), which then callsName#getFirstName(). -
StudentCardthen callsDetailedInfoSection#SetDeatiledHeaderBar(), which then callsDetailedInfoSection#SetDeatiledHeaderBar(), with theFirstNamereturned from the previous calls. -
DetailedInfoSectioncreates a newHeaderBarand sets it to be the newDetailedHeaderBarto be displayed. - If
Studentdoes not haveLessons,StudentCardwill create a newEmptyLessonsContentwith theStudent. - If
StudenthaveLessons,StudentCardwill create a newFilledLessonsContentwith theStudent. - The
FilledLessonsContentconstructor callsStudent#getName(),Student#getPastLessonsList(),Student#UpcomingLessonsList(), which returns the name, Past Lessons List, and Upcoming Lessons List. -
StudentCardthen callsDetailedInfoSection#SetDeatiledContent(), which then callsDetailedInfoSection#SetDeatiledContent(), with theEmptyLessonsContentorFilledLessonsContentcreated from the previous calls. -
DetailedInfoSectionsets it to be the newDetailedContentto be displayed.
- Based on the graph above, after the user clicks the view lessons button,
-
EmptyExamsContentandFilledExamsContentextendGeneralExamsContent, representing the situation where theStudenthasExamsand where theStudenthas noExamsrespectively.Specifically,
FilledExamsContenthasAllExamsListPanelwithExamCardon it, showing all pastExamsof aStudentandUpcomingLessonsListPanelwithExamCardon it, showing the most recent three upcomingExamsof aStudentGiven below is the partial class diagram of
Uicomponent related to Filled Exams Content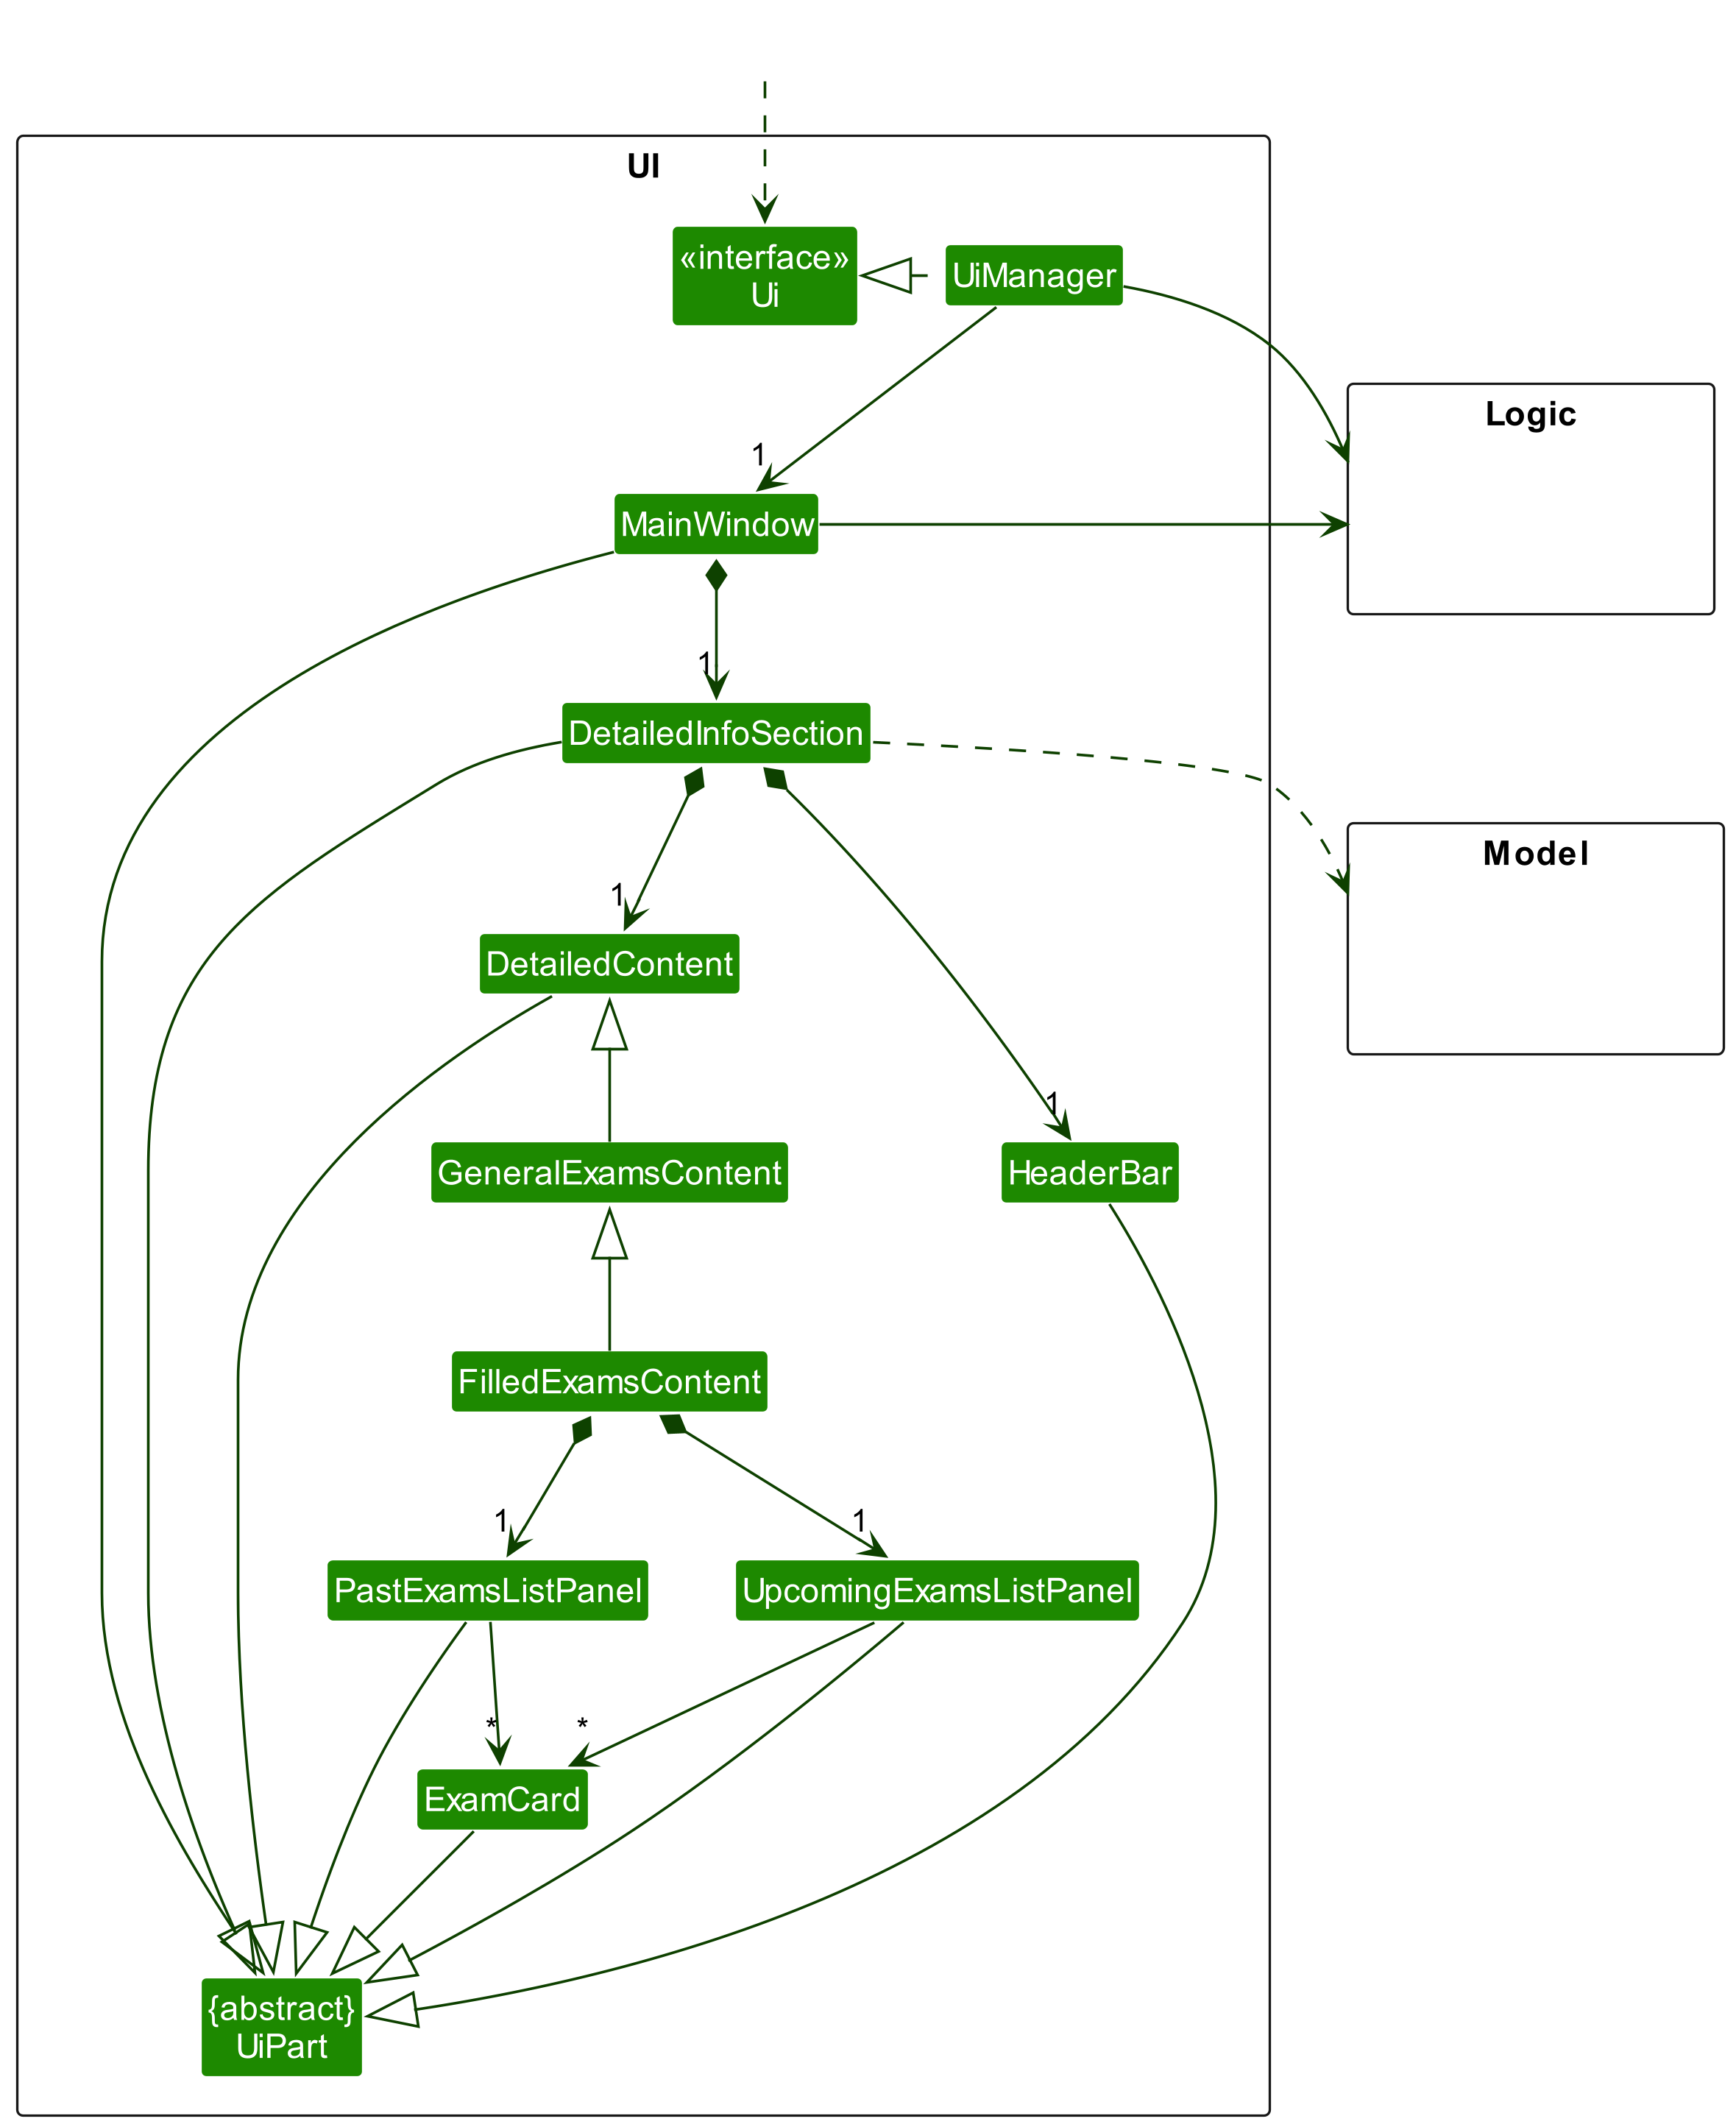
Given below is the sequence diagram showing how the action of clicking the
ExamsButtonof aStudentcreates a newExamsContentfor that particular student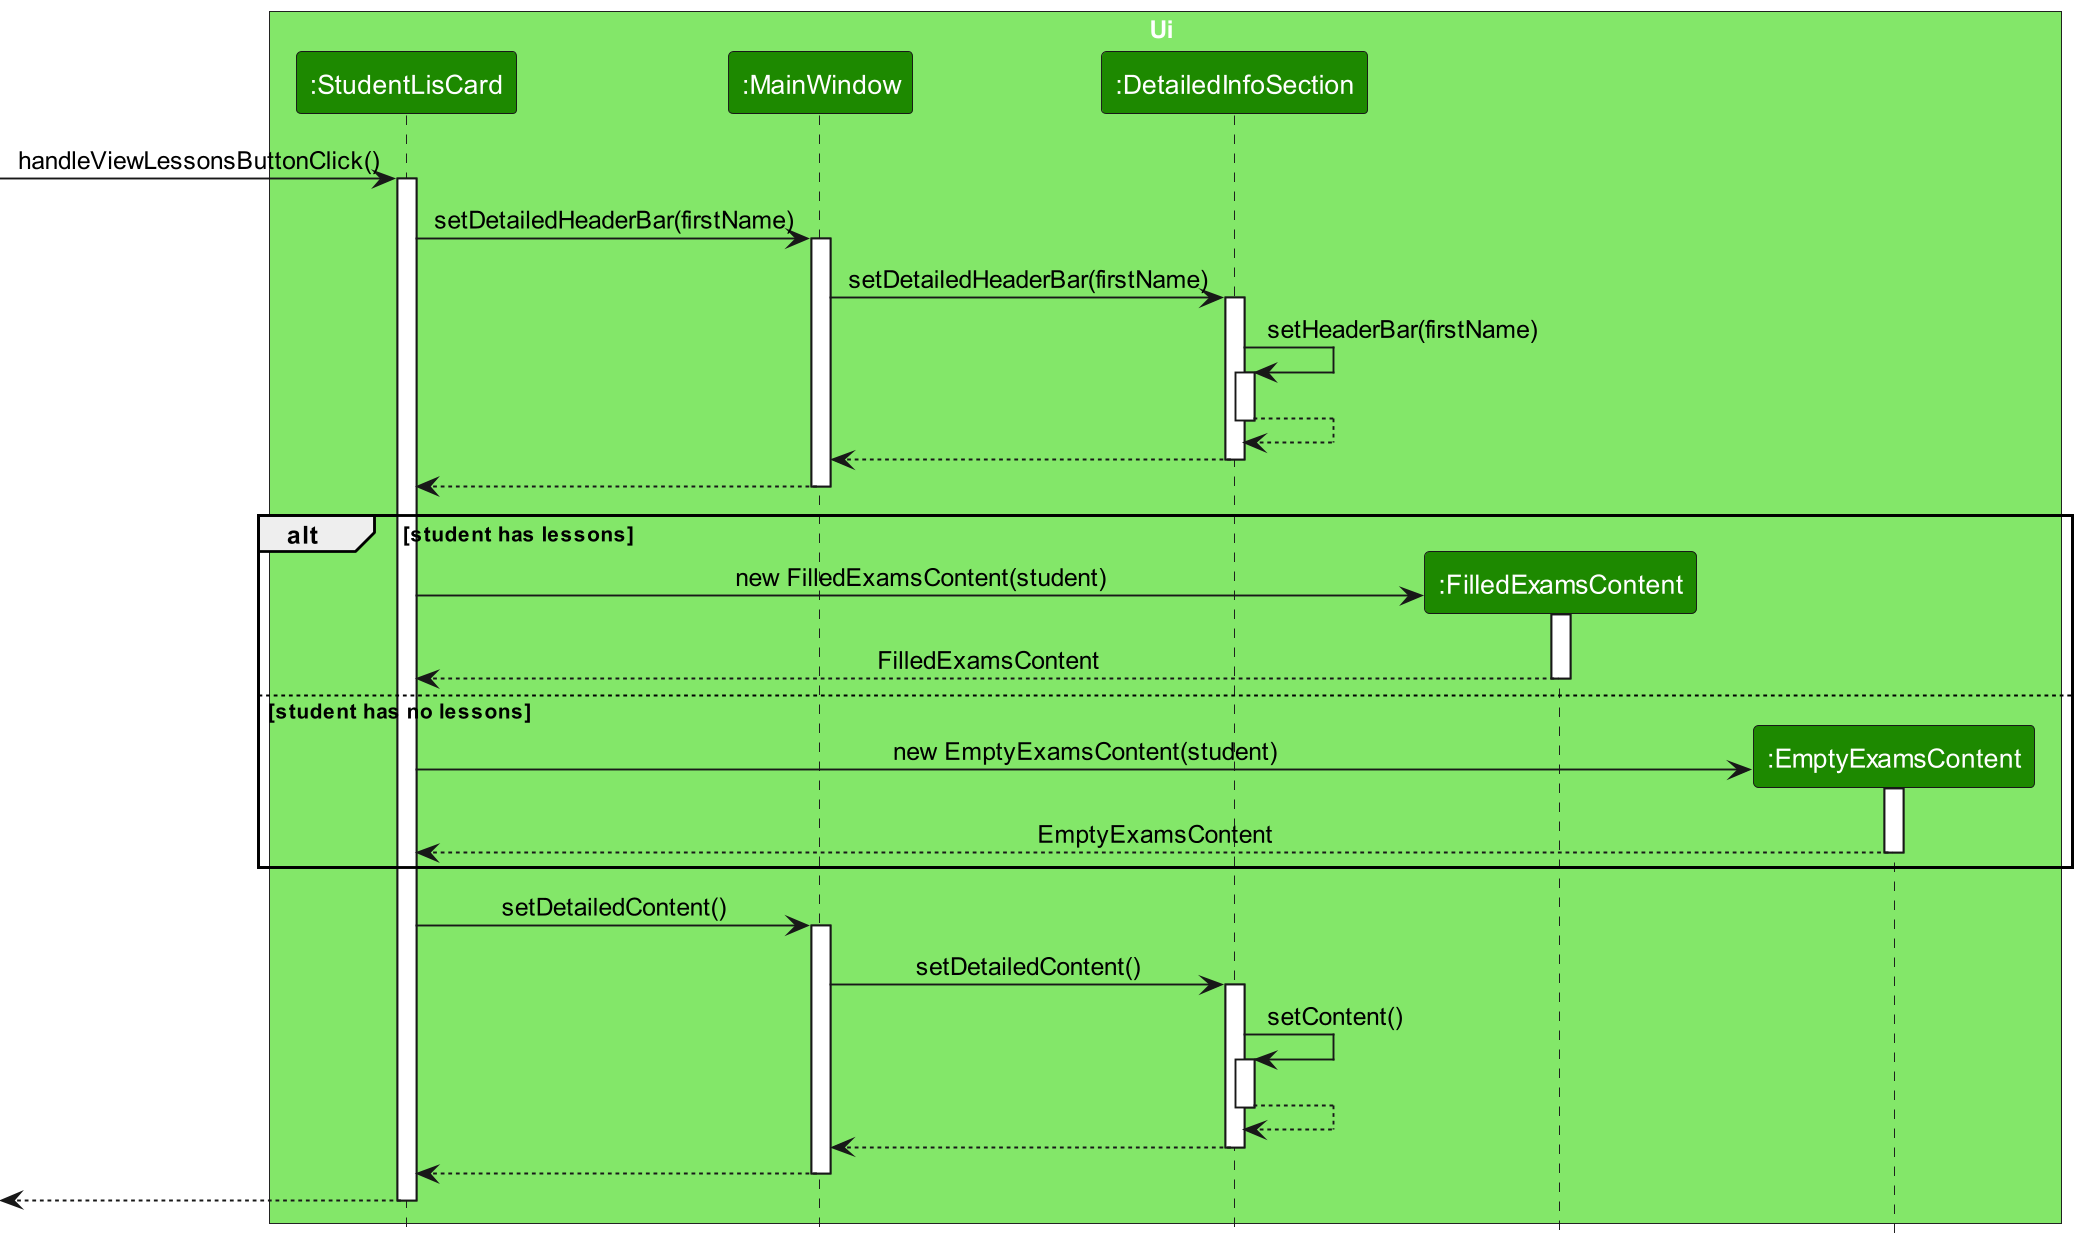
How the Filled Exams Section is created when the Exam Button is Clicked
- Based on the graph above, after the user clicks the view exams button,
StudentCardcallsStudent#getFullName(), which then callsName#getFirstName(). -
StudentCardthen callsDetailedInfoSection#SetDeatiledHeaderBar(), which then callsDetailedInfoSection#SetDeatiledHeaderBar(), with theFirstNamereturned from the previous calls. -
DetailedInfoSectioncreates a newHeaderBarand sets it to be the newDetailedHeaderBarto be displayed. - If
Studentdoes not haveExams,StudentCardwill create a newEmptyExamsContentwith theStudent. - If
StudenthaveExams,StudentCardwill create a newFilledExamsContentwith theStudent. - The
FilledExamssContentconstructor callsStudent#getName(),Student#ExamsList(),Student#UpcomingExamsList(), which returns the name, All Exam List, Upcoming Exams List. -
StudentCardthen callsDetailedInfoSection#SetDeatiledContent(), which then callsDetailedInfoSection#SetDeatiledContent(), with theEmptyExamsContentorFilledExamsContentcreated from the previous calls. -
DetailedInfoSectionsets it to be the newDetailedContentto be displayed.
- Based on the graph above, after the user clicks the view exams button,
The following activity diagram summarises how the UI responds to a click button command.
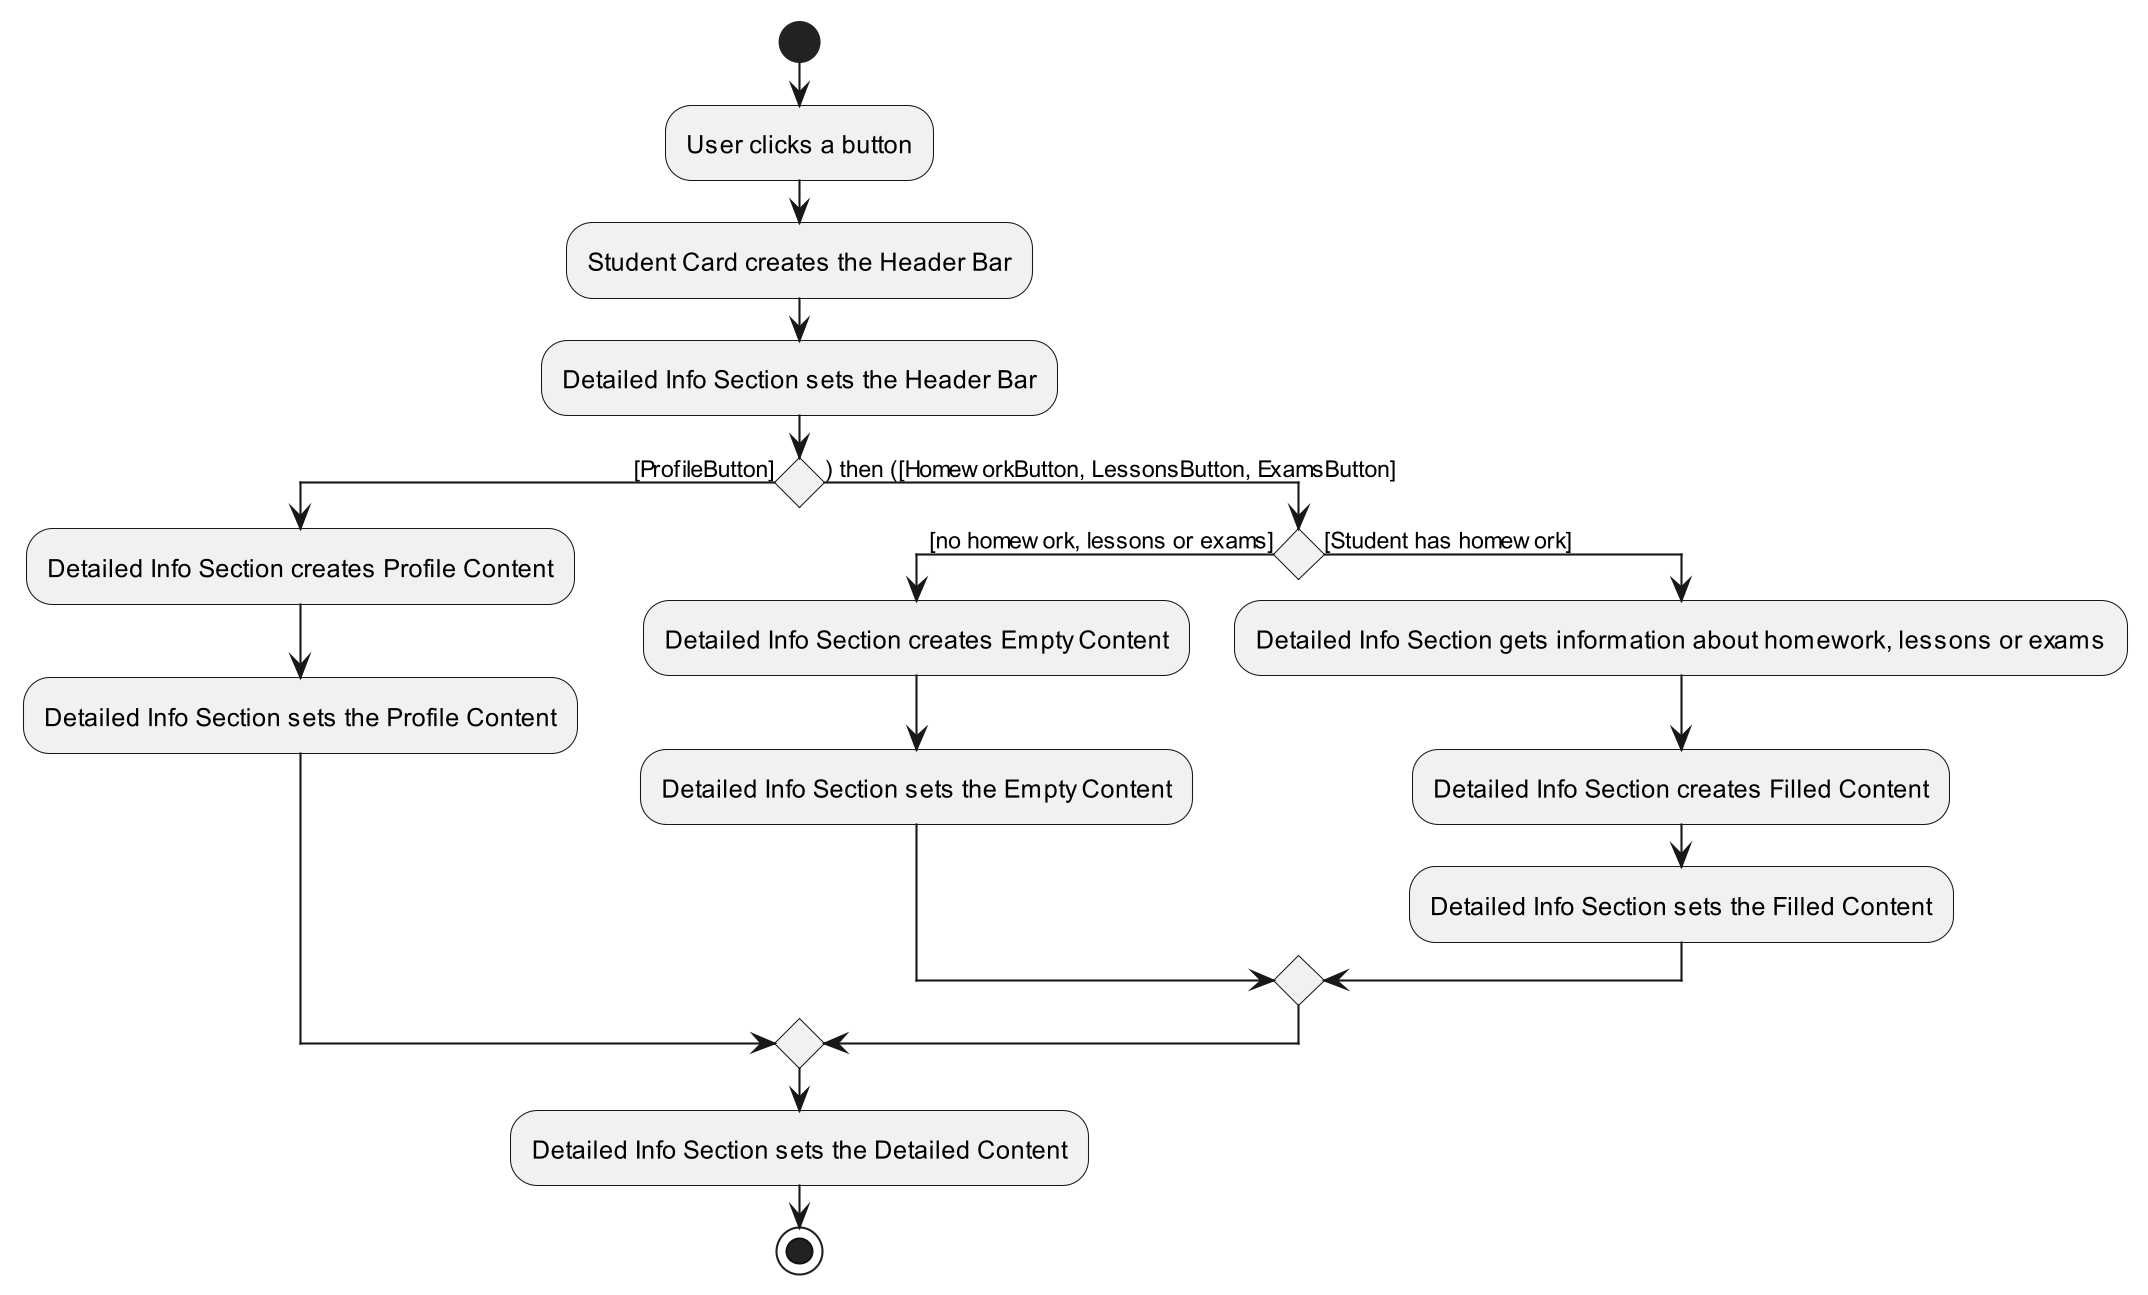
Alternatives considered for Quick Access Buttons
While designing the Quick Access Buttons on the Student Card, several alternatives were considered to ensure an optimal user experience.
-
Alternative 1 : One alternative that was considered was to have a pop-up window for each button click event. However, this alternative was ultimately rejected due to its potential drawbacks.
- Pros:
- Provides a clear and separate window to display the detailed information for each button.
- It Can be designed to provide a consistent layout and structure for displaying the detailed information.
- It Can be a good choice if there is a need to provide a lot of detailed information for each button click.
- It Can be helpful in providing a larger viewing area for the detailed information.
- Cons:
- It Requires additional user interaction to close the pop-up window, which can be cumbersome and time-consuming.
- It Can be less optimized for a command-line interface (CLI), where users prefer quick and direct access to information.
- It Can lead to a cluttered user interface if multiple pop-up windows are open at the same time.
- It Can require additional resources and time to design and implement compared to other alternatives.
- Pros:
-
Alternative 2 : Another alternative that was considered was to have a separate panel for each button click event. However, this alternative was ultimately rejected due to its potential drawbacks.
- Pros:
- Provides a clear and separate panel to display the detailed information for each button.
- It Can be designed to provide a consistent layout and structure for displaying the detailed information.
- It Can be a good choice if there is a need to provide a lot of detailed information for each button click.
- It Can be helpful in providing a larger viewing area for the detailed information.
- Cons:
- It Requires additional user interaction to close the panel, which can be cumbersome and time-consuming.
- It Can be less optimized for a command-line interface (CLI), where users prefer quick and direct access to information.
- It Can lead to a cluttered user interface if multiple panels are open at the same time.
- It Can require additional resources and time to design and implement compared to other alternatives.
- Pros:
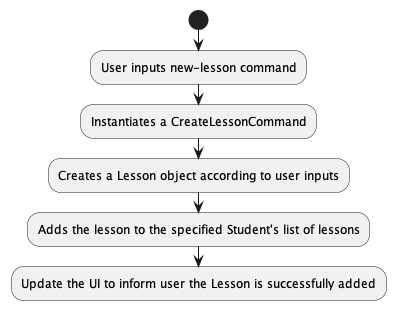
Create Lesson feature
the new-lesson command adds a Lesson (specified with student name, lesson name, start time, and end time) to a particular Student. Given below is an example usage scenario and how the command works:
Step1. The user inputs a new-lesson command with parameters name/John, lesson/Math lesson, start/2023-05-01 1200, and end/2023-05-01 1400. When Logic is called upon to execute a command, it uses the AddressBookParser class to parse the user command. The parser recognises the command words and calls the CreateLessonCommandParser.
Step2. The CreateLessonCommandParser recognises each parameter passed in.
Step3. CreateLessonCommandParser creates a new CreateLessonCommand with appropriate parameters.
Step4. CreateLessonCommand is executed by LogicManager, creating a new Lesson object and then calls the addLesson method in Student
Step5. The Student calls the addLesson method in the UniqueLessonList, adding the Lesson to his list of Lessons.
Step6. The result of the command execution is encapsulated as a CommandResult object which is returned from Logic.
The Sequence Diagram below illustrates the interactions within the Logic component for to execute(“new-lesson name/John lesson/Math lesson start/2023-05-01 1200 end/2023-05-01 1400”) API call.
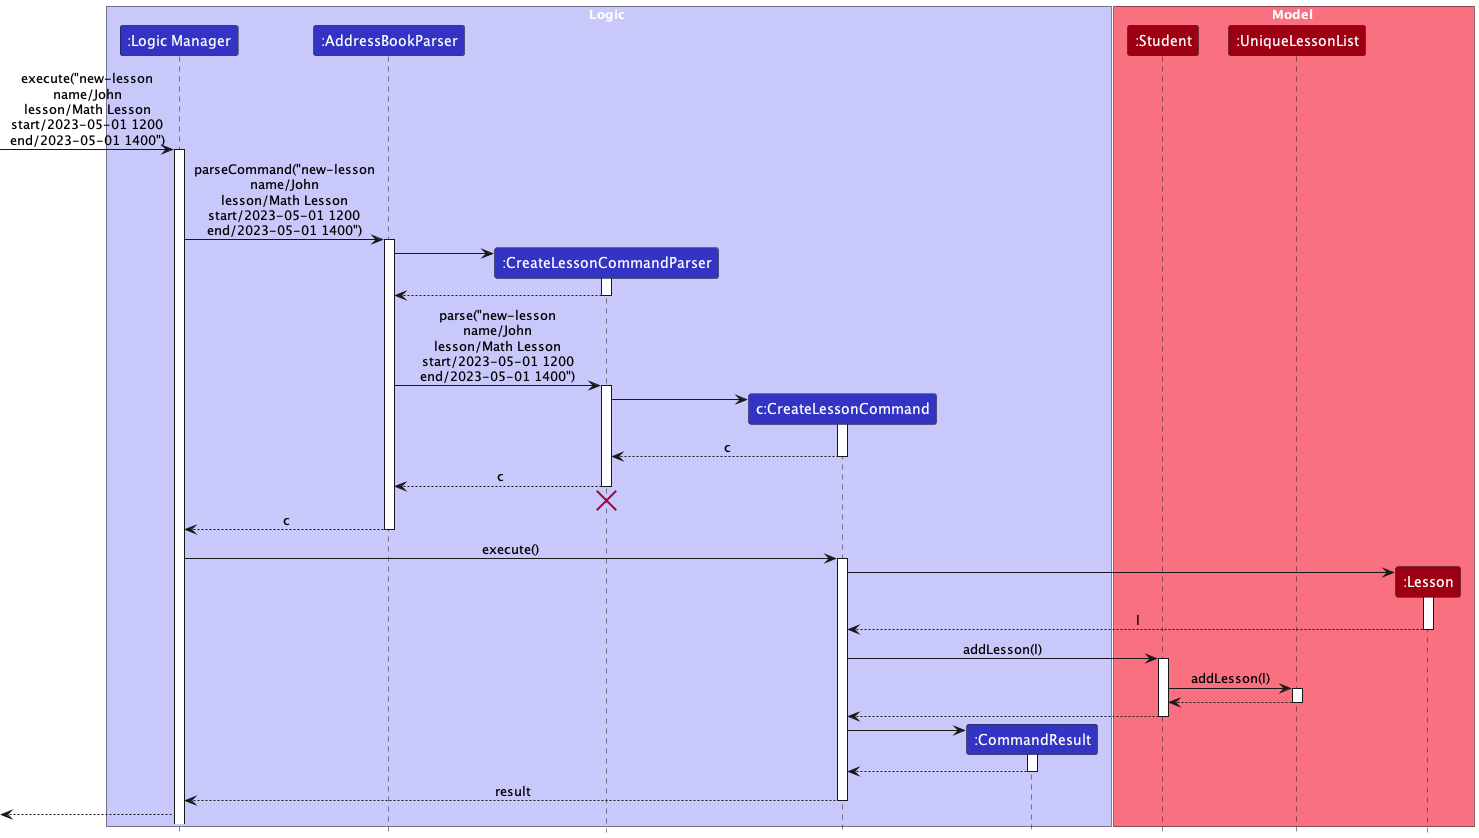
The following activity diagram summarizes what happens when a user executes a CreateLessonCommand:
School and GradeLevel Fields
v1.2 Implementation of School and GradeLevel Fields
As of v1.2, School and GradeLevel fields are parsed via the AddCommandParser class. AddCommandParser#parse method
checks whether the prefixes for school and/or gradeLevel are present, and if present, then adds it to
the new student as Tags. They are then treated throughout the program the same as other Tags.
It has been implemented this way for its ease of implementation, and because it shows the School and GradeLevel in the Students list view, without having to open up the student’s profile.
New Implementation of School and GradeLevel Fields in v1.3
In v1.3, we’re adding School and GradeLevel as separate fields in the Student’s profile, instead of Tags. These will
show up in the Student Profile view.
This is to reduce the number of Tags placed under each Student’s name in the Students list view, making it look less cluttered.
[Proposed] Undo/redo feature
Proposed Implementation
The proposed undo/redo mechanism is facilitated by VersionedAddressBook. It extends AddressBook with an undo/redo history, stored internally as an addressBookStateList and currentStatePointer. Additionally, it implements the following operations:
-
VersionedAddressBook#commit()— Saves the current address book state in its history. -
VersionedAddressBook#undo()— Restores the previous address book state from its history. -
VersionedAddressBook#redo()— Restores a previously undone address book state from its history.
These operations are exposed in the Model interface as Model#commitAddressBook(), Model#undoAddressBook() and Model#redoAddressBook() respectively.
Given below is an example usage scenario and how the undo/redo mechanism behaves at each step.
Step 1. The user launches the application for the first time. The VersionedAddressBook will be initialized with the initial address book state, and the currentStatePointer pointing to that single address book state.

Step 2. The user executes delete 5 command to delete the 5th student in the address book. The delete command calls Model#commitAddressBook(), causing the modified state of the address book after the delete 5 command executes to be saved in the addressBookStateList, and the currentStatePointer is shifted to the newly inserted address book state.

Step 3. The user executes add n/David … to add a new student. The add command also calls Model#commitAddressBook(), causing another modified address book state to be saved into the addressBookStateList.

Model#commitAddressBook(), so the address book state will not be saved into the addressBookStateList.
Step 4. The user now decides that adding the student was a mistake, and decides to undo that action by executing the undo command. The undo command will call Model#undoAddressBook(), which will shift the currentStatePointer once to the left, pointing it to the previous address book state, and restores the address book to that state.

currentStatePointer is at index 0, pointing to the initial AddressBook state, then there are no previous AddressBook states to restore. The undo command uses Model#canUndoAddressBook() to check if this is the case. If so, it will return an error to the user rather
than attempting to perform the undo.
The following sequence diagram shows how the undo operation works:

UndoCommand should end at the destroy marker (X) but due to a limitation of PlantUML, the lifeline reaches the end of diagram.
The redo command does the opposite — it calls Model#redoAddressBook(), which shifts the currentStatePointer once to the right, pointing to the previously undone state, and restores the address book to that state.
currentStatePointer is at index addressBookStateList.size() - 1, pointing to the latest address book state, then there are no undone AddressBook states to restore. The redo command uses Model#canRedoAddressBook() to check if this is the case. If so, it will return an error to the user rather than attempting to perform the redo.
Step 5. The user then decides to execute the command list. Commands that don’t modify the address book, such as list, will usually not call Model#commitAddressBook(), Model#undoAddressBook() or Model#redoAddressBook(). Thus, the addressBookStateList remains unchanged.

Step 6. The user executes clear, which calls Model#commitAddressBook(). Since the currentStatePointer is not pointing at the end of the addressBookStateList, all address book states after the currentStatePointer will be purged. Reason: It no longer makes sense to redo the add n/David … command. This is the behavior that most modern desktop applications follow.

The following activity diagram summarizes what happens when a user executes a new command:

Design considerations:
Aspect: How undo & redo executes:
-
Alternative 1 (current choice): Saves the entire address book.
- Pros: Easy to implement.
- Cons: May have performance issues in terms of memory usage.
-
Alternative 2: Individual command knows how to undo/redo by
itself.
- Pros: Will use less memory (e.g. for
delete, just save the student being deleted). - Cons: We must ensure that the implementation of each command are correct.
- Pros: Will use less memory (e.g. for
Documentation, logging, testing, configuration, dev-ops
Appendix: Requirements
Product scope
Target user profile:
Our users:
- have a need to manage any number of students
- prefer offline desktop apps over other types
- can type commands fast
- prefer typing, with some mouse control
- prefer a more robust, aesthetic GUI, as opposed to a verbose list of students on a command line
- are reasonably comfortable using CLI
Value proposition: Manage students’ academic progress faster and more conveniently than a typical mouse/GUI driven app
User stories
Priorities:
- High (must have) -
* * * - Medium (nice to have) -
* * - Low (unlikely to have) -
*
| Category | Priority | As a … | I want to … | So that I can… |
|---|---|---|---|---|
| Track Student Homework | * * * |
tutor | Create homework logs | I can have a list of homeworks to refer to, for each student. |
* * |
tutor | Edit/Delete any past/future homework logs | I can track any changes in my students’ homeworks. | |
* * * |
tutor | Mark homework as completed/uncompleted | I can track what needs to be done in order to give reminders to student. | |
* * * |
tutor | Assign homework deadlines | I can track when each homework is due, to help students finish them early. | |
* * * |
tutor | View completed and uncompleted homework | I can separately track pending homework. | |
* * |
tutor | View what proportion of my student’s upcoming homework is still pending | I can urge my students to manage their homework workload. | |
| Store and access students’ info (addresses, personal particulars) | * * |
tutor | Click open a view profile button beside a Student to look at his/her home address and phone number |
I can have easy access to the students’ information whenever needed. |
* * |
tutor | Update/Delete my students’ personal information as needed | I can keep my records accurate and up-to-date | |
* * * |
tutor | Click a button with a student’s name to view his/her upcoming school exams/assignments | Change my lesson plans accordingly to prepare the student for such tasks. For example, change all sessions of a week to Chemistry lessons to prepare the student for an upcoming Chemistry exam | |
* |
tutor | I can track which students are at which school and grade level | I can create materials for multiple students of the same grade level. | |
* * |
tutor | Click a button with a student’s name to view his/her upcoming homework, exams and assignments | I have easy access to all relevant information in one click. | |
| Lesson Plan Management | * * * |
tutor | Create lesson plans for future classes | I can always plan ahead of my lessons. |
* * |
tutor | View my students’ lesson history | I can recap past lessons with my student. | |
| tutor | View lesson history filtered by subjects | I can recap past lessons based on different subjects. | ||
* * |
tutor | View the date and time of a past lesson | I can see how many lessons I’ve had over a period of time. | |
| tutor | Edit/Delete lessons | My lesson plan is always up to date. | ||
| Track Student Exams | * * |
tutor | Assign and view school exam dates to my students | I can keep track of how long my student has to prepare for an exam. |
* * |
tutor | View all my students’ exams at a glance | I can provide extra instruction to students that have exams coming up. |
Use cases
Add a new student
MSS
- User enters new-student command with NAME, ADDRESS, PHONE, EMAIL and (optionally) School, Grade Level.
-
TutorPro adds the new student to the student list.
Use case ends.
Extensions
- 2a. A student with the same name already exists.
- 2a1. TutorPro notifies the user of a duplicate.
- 2a2. TutorPro continues to take input.
Use case continues at step 1.
- 2b. The wrong formatting was used.
- 2b1. TutorPro notifies the user of wrong formatting.
- 2b2. TutorPro continues to take input.
Use case continues at step 1.
Delete a student
MSS
- User requests to list students
- TutorPro shows a list of students
- User requests to delete a specific student in the list
-
TutorPro deletes the student
Use case ends.
Extensions
-
2a. The list is empty.
Use case ends.
-
3a. The given index is invalid.
- 3a1. TutorPro shows an error message.
Use case resumes at step 2.
Update a student’s particulars
MSS
- User enters update-info command with any of the optional fields: NAME, ADDRESS, PHONE, EMAIL, SCHOOL, GRADE LEVEL.
- TutorPro updates the student’s particulars. Use case ends.
Extensions
- 2a. The wrong formatting was used.
- 2b1. TutorPro notifies the user of wrong formatting.
- 2b2. TutorPro continues to take input. Use case continues at step 1.
View a student’s profile
MSS
- User requests to list students
- TutorPro shows a list of students
- User clicks on Profile button of a particular student
-
TutorPro displays the profile of that student.
Use case ends.
Extensions
-
1a. The list is empty.
Use case ends.
Assign homework for a student
MSS
- User requests to list students
- TutorPro shows a list of students
- User enters new-homework command with student’s name, homework title, and deadline.
-
TutorPro assigns the homework to that particular student.
Use case ends.
Extensions
-
2a. The list is empty.
Use case ends.
- 3a. The given name doesn’t exist in the list.
- 3b. The user used invalid command format.
-
3c. The user provided a date that is earlier than the current date.
- 3*1. TutorPro shows an error message.
Use case resumes at step 3.
View a Student’s Homework
MSS
- User enters view-homework command with a student’s name.
-
TutorPro shows all the completed/pending homework of that student.
Use case ends.
Extensions
- 1a. Alternatively, the user clicks on the Homework button next to the student name.
- 1a1. TutorPro displays homework information on the Detailed Information section.
Mark a Homework as DONE
MSS
- User clicks on Homeworks button of a student.
- TutorPro shows that student’s homeworks.
- User enters mark-homework with student name, and homework index.
-
TutorPro updates the status of that homework as DONE.
Use case ends.
Extensions
-
2a. The student’s homework list is empty.
Use case ends.
-
3a. The given index is invalid.
- 3a1. TutorPro shows an error message.
Use case resumes at step 3.
Mark a Homework as NOT DONE
MSS
- User clicks on Homeworks button of a student.
- TutorPro shows that student’s homeworks.
- User enters unmark-homework command with student name, and homework index.
-
TutorPro updates the status of that homework as NOT DONE.
Use case ends.
Extensions
-
2a. The student’s homework list is empty.
Use case ends.
-
3a. The given index is invalid.
- 3a1. TutorPro shows an error message.
Use case resumes at step 3.
View a particular Student’s Lessons
MSS
- User clicks on Lessons button of a student.
-
TutorPro shows that student’s past and upcoming Lessons.
Use case ends.
Extensions
-
2a. The student’s lesson list is empty.
Use case ends.
View all Students’ Lesson history
MSS
- User enters view-lesson command without any arguments.
-
TutorPro shows all students’ past and upcoming Lessons.
Use case ends.
Extensions
- 2a. None of the students have any lessons.
-
2a1. TutorPro shows an empty Lesson list.
Use case ends.
-
Add Lesson
MSS
- User enters new-lesson command with student name, lesson title and start and end times.
-
TutorPro adds the lesson to that student’s Lesson list.
Use case ends.
Extensions
- 1a. The named student doesn’t exist
-
1a1. TutorPro returns an error message.
Use case resumes at 1.
-
- 1b. The start/end time is in the past.
-
1b1. TutorPro returns an error message.
Use case resumes at 1.
-
- 1c. The start/end time format is invalid.
-
1c1. TutorPro returns an error message showing the accepted time formats.
Use case resumes at 1.
-
Add Exam
MSS
- User enters new-exam command with student name, exam title and start and end times.
-
TutorPro adds the exam to that student’s exam list.
Use case ends.
Extensions
- 1a. The named student doesn’t exist
-
1a1. TutorPro returns an error message.
Use case resumes at 1.
-
- 1b. The start/end time is in the past.
-
1b1. TutorPro returns an error message.
Use case resumes at 1.
-
- 1c. The start/end time format is invalid.
-
1c1. TutorPro returns an error message showing the accepted time formats.
Use case resumes at 1.
-
View a particular Student’s Exams
MSS
- User clicks on Exams button of a student.
-
TutorPro shows that student’s past and upcoming Exams.
Use case ends.
Extensions
-
2a. The student’s exam list is empty.
Use case ends.
View all Students’ Exams
MSS
- User enters view-exam command without any arguments.
-
TutorPro shows all students’ past and upcoming exams.
Use case ends.
Extensions
- 2a. None of the students have any lessons.
-
2a1. TutorPro shows an empty Lesson list.
Use case ends.
-
Non-Functional Requirements
- Should work on any mainstream OS as long as it has Java
11or above installed. - Should be able to hold up to 1000 students without a noticeable sluggishness in performance for typical usage.
- A user with above average typing speed for regular English text (i.e. not code, not system admin commands) should be able to accomplish most of the tasks faster using commands than using the mouse.
- Commands should be easy to remember(close to English words) and not cryptic for non-tech users to remember.
- Commands shouldn’t be verbose.
- Results should be easy to read for non-tech users (e.g. shouldn’t look like long, cluttered log files).
Glossary
- Student: A student who is taking lessons from the Tutor.
- Tutor: A student who is teaching the Student. Here, the Tutor is also the user of the application.
- Lesson: A meeting between the Tutor and the Student.
- Exam: A test taken by the Student.
- Homework: A task given to the Student by the Tutor.
- TutorPro: The name of the application.
- Mainstream OS: Windows, Linux, Unix, OS-X
Planned Enhancements
Properly Handle Long Names
- Issue: Currently, if the student’s name are too long, on the student card, the name will be truncated. The full name can only be seen by view-profile command, and via the Clicking the profile button on the student card.
- Possible Solution to Implement in the Future:
- Truncate the name to a certain length, and add an ellipsis at the end.
- Add a tooltip to the name label, so that the full name can be seen when the user hovers over the name label.
Properly Handle Long Tags
- Issue: Currently, TutorPro disallows the user to add tags that exceeds 30 characters in length.
- Possible Solution to Implement in the Future:
- Truncate the tag to a certain length, and add an ellipsis at the end.
- Add a tooltip to the tag label, so that the full tag can be seen when the user hovers over the tag label.
Resizable Main Window
- Issue: Currently, the main window is not resizable.
- Possible Solution to Implement in the Future:
- Make the main window resizable.
- Make the main window resizable, but with a minimum size.
- Properly handle the proportion of the different components in the main window when the main window is resized.
Storage Encryption
- Issue: Currently, the data is stored in plain text and can be easily modified by the users. If the user make a change that can be parsed by the parser to the data, the application will not detect it but can cause unexpected behaviour.
- Possible Solution to Implement in the Future:
- Encrypt the data before storing it.
- Encrypt the data before storing it, and allow the user to set a password to decrypt the data.
- Make the data unmodifiable by the user.
Synchronized Commands and Detailed Information Section
- Issue: Currently, the commands are not synchronized with the detailed information section. For example, if the user updates the name of a student, the Detailed Information Section will refresh to the Welcome Page, and the user will have to click on the student card again to see the updated name.
- Possible Solution to Implement in the Future:
- Make the Detailed Information Section refresh to the corresponding profile, homework, lesson, or exam page that the user is operating on.
Better Error Message
- Issue: Currently, the error message is not very descriptive. For example, if the user enters an invalid command, the error message will be “Invalid command format! + [the correct format of the command]”.
- Possible Solution to Implement in the Future:
- Make the error message more descriptive. For example, if the user enters an invalid command, the error message will be “Invalid command format! + [the correct format of the command] + [the reason why the command is invalid]”.
- Use color to highlight the invalid part of the command.
Customizable Color Theme
- Issue: Currently, the color theme of the application is fixed.
- Possible Solution to Implement in the Future:
- Allow the user to customize the color theme of the application.
- Allow the user to choose from a few pre-defined color themes.
Customizable Font
- Issue: Currently, the font of the application is fixed.
- Possible Solution to Implement in the Future:
- Allow the user to customize the font of the application.
- Allow the user to choose from a few pre-defined fonts.
Empty Data File Handling
- Issue: Currently, if the user opens the application for the first time, TutorPro will show a set of sample students. However, if the user’s data file is somehow corrupted, TutorPro will show an empty student list. This can be confusing for the user.
- Possible Solution to Implement in the Future:
- Show a set of sample students if the data file is corrupted, and allow the user to import the sample students into the data file.
- Show where the data file is located and how is the data file corrupted, and allow the user to fix the data file.
Memo for Lessons
- Issue: Currently, the user cannot add any remarks to a lesson.
- Possible Solution to Implement in the Future:
- Allow the user to add a memo to a lesson.
- Allow the user to add a memo to a lesson, and allow the user to view the memo in the Detailed Information Section.
Appendix: Instructions for manual testing
Given below are instructions to test the app manually.
Launch and shutdown
-
Initial launch
-
Download the jar file and copy into an empty folder
-
use the command
java -jar TutorProjar file Expected: Shows the GUI with a set of sample contacts. The window size may not be optimum.
-
Deleting a student
-
Deleting a student while all students are being shown
-
Prerequisites: List all students using the
listcommand. Multiple students in the list. -
Test case:
delete index/1
Expected: First student is deleted from the list. Details of the deleted student shown in the status message. -
Test case:
delete index/0
Expected: No student is deleted. Error details shown in the status message. -
Other incorrect delete commands to try:
delete,delete index/x,...(where x is larger than the list size)
Expected: Similar to previous.
-
Saving data
-
Dealing with missing/corrupted data files
- Exit TutorPro.
- Open the data/addressbook.json file in a suitable text editor.
- Delete some lines randomly.
- Reopen TutorPro. Expected: Should start with a new TutorPro with sample data.
Appendix: Effort
Our team feels that we’ve put in more effort than that was required for this project, as we implemented many new features and enhancements that were not required for the project. We’ve also spent a lot of time on the UI, as we wanted to make the application as user-friendly as possible. We’ve also spent a lot of time on the documentation, as we wanted to make the documentation as detailed as possible, so that the user can easily understand how to use the application.
We faced several difficulties in the project.
- Difficulty managing the schedule clash of Student’s lessons and exams.
- Since the Student’s lessons and exams are stored in separate lists, we have to carefully handle the interactions between the two lists. We also have to make sure that our assumptions about the clashes are as realistic as possible.
- For example, we assume those no two students can have lessons at the same time but two students can sit for the same exam at the same time.
- It takes us a lot of time to come up with a design that can handle all the possible clashes.
- Difficulty in implementing new UI
- We have to carefully handle the interactions between the different components in the UI.
- For example, we have to make sure that the Detailed Information Section is updated when the user clicks on a different student card.
- It takes us a lot of time to come up with a design that can handle all the possible interactions.
- Difficulty in UG and DG
- The User Guide and Developer Guide underwent extensive revisions and proofreading to accommodate the numerous new entities and commands that were added to the product. These changes were necessary to ensure that users and future developers could fully comprehend how the product operates. Having comprehensive documentation is crucial in helping users and developers utilize the product effectively and efficiently, which ultimately leads to an enhanced user experience and increased adoption. It’s commendable that you invested time and effort into updating and refining your guides.
We also saved many efforts and time by reuse
- reuse date and time parser from RussellDash332’s ip code
- RussellDash332’s code provides a nice and need way to parse multiple formats of date and time, which saves us a lot of time.
- This reuse allows us to focus on other parts of the project.
Effort Required and Achievement of our Team
- Our team has invested significant time and effort in this project with the goal of meeting the needs of our users and enhancing their experience when using our product. By expanding on the original AB3 code base, we have made substantial progress in the development of our product, as evidenced by the lines of code we have written and number of new commands we have created. Our ultimate desire is for our users to find our product effective in addressing their needs and for future developers to express interest in contributing to its further growth and development.